A DIY worm composter can be as simple as two matching plastic storage totes, one nested inside the other. The top tote holds the worms and their bedding, the bottom one catches liquid, and a drill does nearly all the work. No special tools or skills are needed.
The details that decide whether the bin works are size, holes and materials. A bin that is too deep, has nowhere for water to go, or is built from the wrong wood causes problems that careful feeding can't fix. This guide covers the build. For the first weeks after the worms move in, see our guide to starting a worm farm.
Quick answer: Use two same-size opaque totes of about 14 gallons (53 L). Drill up to 20 ¼-inch (6 mm) drainage holes in the bottom of the top tote and up to 10 ¼-inch air holes 2–3 inches (5–8 cm) below its rim, screen the air holes, then nest it on spacers inside the second tote to catch liquid. Plan on about 1 cubic foot (28 L) of bin per pound (0.45 kg) of food scraps a week.
How big should a DIY worm composter be?
Size the bin to your food scraps, not to your kitchen. Oregon State University Extension's guide, Composting With Worms, suggests about 1 cubic foot (28 L) of bin space for each pound (0.45 kg) of kitchen waste you produce per week. NC State Extension puts it in terms of surface: one square foot (0.09 m²) of bin surface per pound of food scraps a week.
Surface area matters more than depth because red wigglers live and feed in the top layer. Oregon State says a worm bin should be no more than 1 foot (30 cm) deep so it stays aerobic. NC State's example for 2 pounds (0.9 kg) of scraps a week is a bin 2 feet by 1 foot (61 × 30 cm) and 8–20 inches (20–51 cm) deep.
If you have no idea how much you throw away, collect and weigh a week's worth of fruit and vegetable scraps before you buy anything.
| Food scraps per week | Bin size | Example container | Worms to start |
|---|---|---|---|
| About 1 lb (0.45 kg) | About 1 cu ft (28 L) | Small tote, 8–10 gal (30–38 L) | About 1 lb (0.45 kg) |
| About 2 lb (0.9 kg) | 2 cu ft (57 L), 1 × 1 × 2 ft | 14-gal (53 L) tote, for 2–3 people | 2–2½ lb (0.9–1.1 kg) |
| About 6 lb (2.7 kg) | 6 cu ft (170 L), 1 × 2 × 3 ft | Wooden box, for 4–6 people | Up to 6 lb (2.7 kg) |
The 2-pound and 6-pound rows, worm amounts included, come from Oregon State's examples. The 1-pound row applies NC State's starting rate of about 1 pound of worms per square foot of surface. You can start with fewer worms and feed less at first. Worm populations grow, so a bin with a little spare room is easier to live with than one that's packed from day one. Our guide to red composting worms explains how fast they breed and where to buy them.
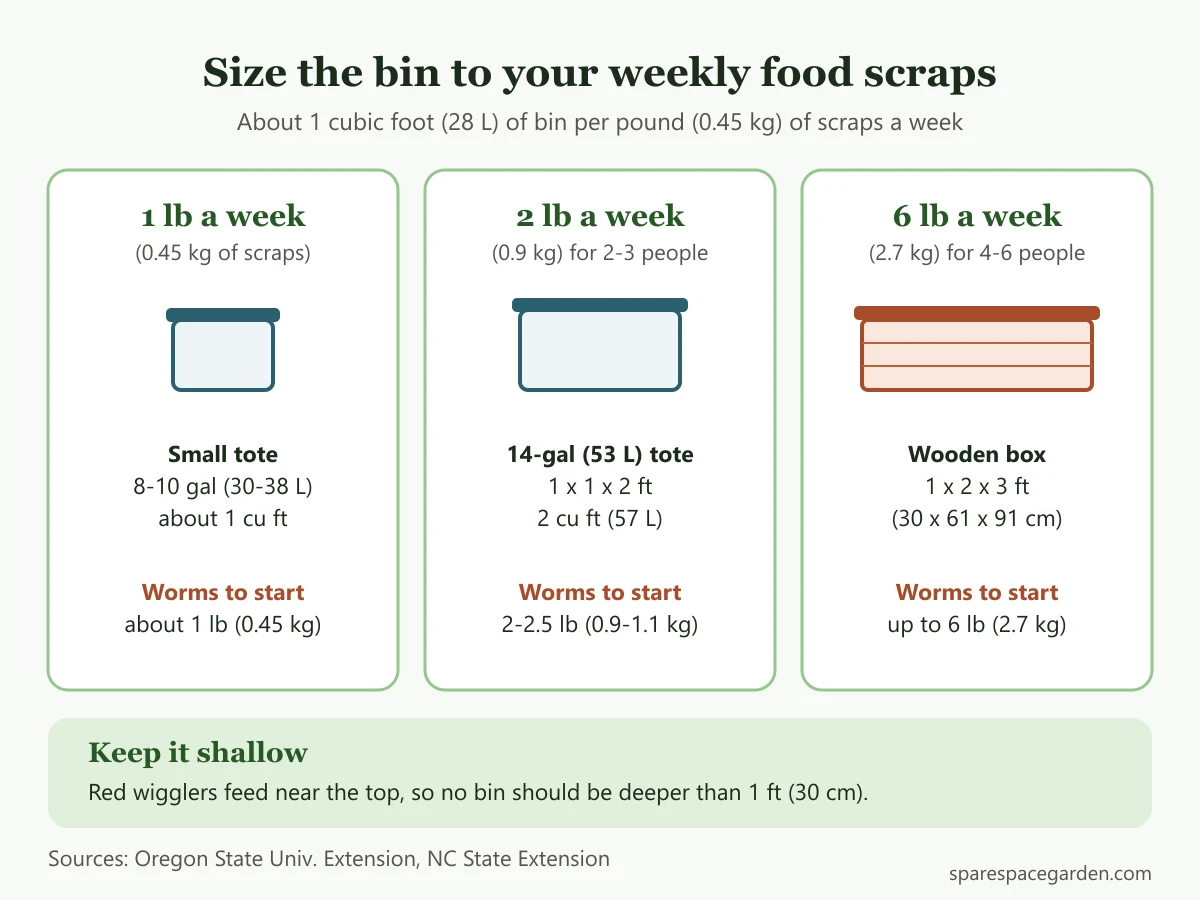 Match the bin to how much food you throw away each week.
Materials and tools you need
For the classic two-bin design:
- Two opaque plastic totes with lids, the same size. Oregon State suggests 14 gallons (53 L) as a starting size, and UC Santa Barbara's build uses two 10-gallon (38 L) totes. Opaque matters because worms are sensitive to light.
- A drill with a ¼-inch (6 mm) bit. Add a 1-inch (2.5 cm) hole bit only if you plan to fit commercial vents.
- Spacers. Oregon State recommends plastic spacers, noting that wood and bricks are harder to clean. UC Santa Barbara's bin instructions use two blocks of 4×4 lumber about 5 inches (13 cm) long, specifically not pressure-treated.
- Window screen and waterproof glue. The EPA's worm bin guide specifies vinyl screening rather than metal.
- A marker and a tape measure.
Materials to avoid
- Clear or see-through totes. Light drives worms down and away from the food on top.
- Pressure-treated wood, for the bin, the spacers or anything inside. Oregon State's guide is blunt: "Do not use pressure-treated wood for worm bins."
- Cedar, redwood and cypress. Oregon State notes that woods with natural pest deterrents may also be toxic to worms.
- Metal containers. Larimer County's vermicomposting guide recommends plastic or wood, not metal.
What it costs
None of the extension guides gives a single price for a tote bin. Oregon State describes the two-tote system as relatively low cost, and the totes are the main expense if you already own a drill. For a wooden bin, WSU Extension in Whatcom County estimated its plywood plan at about $25 in materials, though lumber prices vary by region and year, so check current costs before you shop.
How to build a two-bin DIY worm composter
In the steps below, the "worm bin" is the tote that holds the worms and the "catch tote" is the one underneath.
- Set the spacers. Place two or more spacers in the bottom of the catch tote. They hold the worm bin above any liquid, and Oregon State notes they also stop the two totes from sticking together.
- Nest the totes and mark a line. Set the worm bin inside, on the spacers, and mark where the catch tote's rim meets it. UC Santa Barbara uses this line so the side air holes aren't covered by the lower tote.
- Drill the drainage holes. Lift the worm bin out and drill up to 20 ¼-inch (6 mm) holes in its bottom, mostly in the lowest spots, as Oregon State suggests. NC State uses six evenly spaced ¼-inch holes, so anything from about 6 to 20 works.
- Drill the air holes. Drill up to 10 ¼-inch (6 mm) holes around the sides, 2–3 inches (5–8 cm) below the rim and above your marked line. With commercial vents, Oregon State suggests four or more 1-inch (2.5 cm) holes along the top edge instead.
- Screen the air holes. Glue screen over them with waterproof glue. Oregon State says fine mesh keeps small flies out and worms in.
- Clean up the plastic. Pick off the curls of plastic the drill leaves behind. UC Santa Barbara notes they can block the holes later.
- Reassemble. Set the worm bin back on the spacers and put its lid on. The catch tote's lid isn't needed.
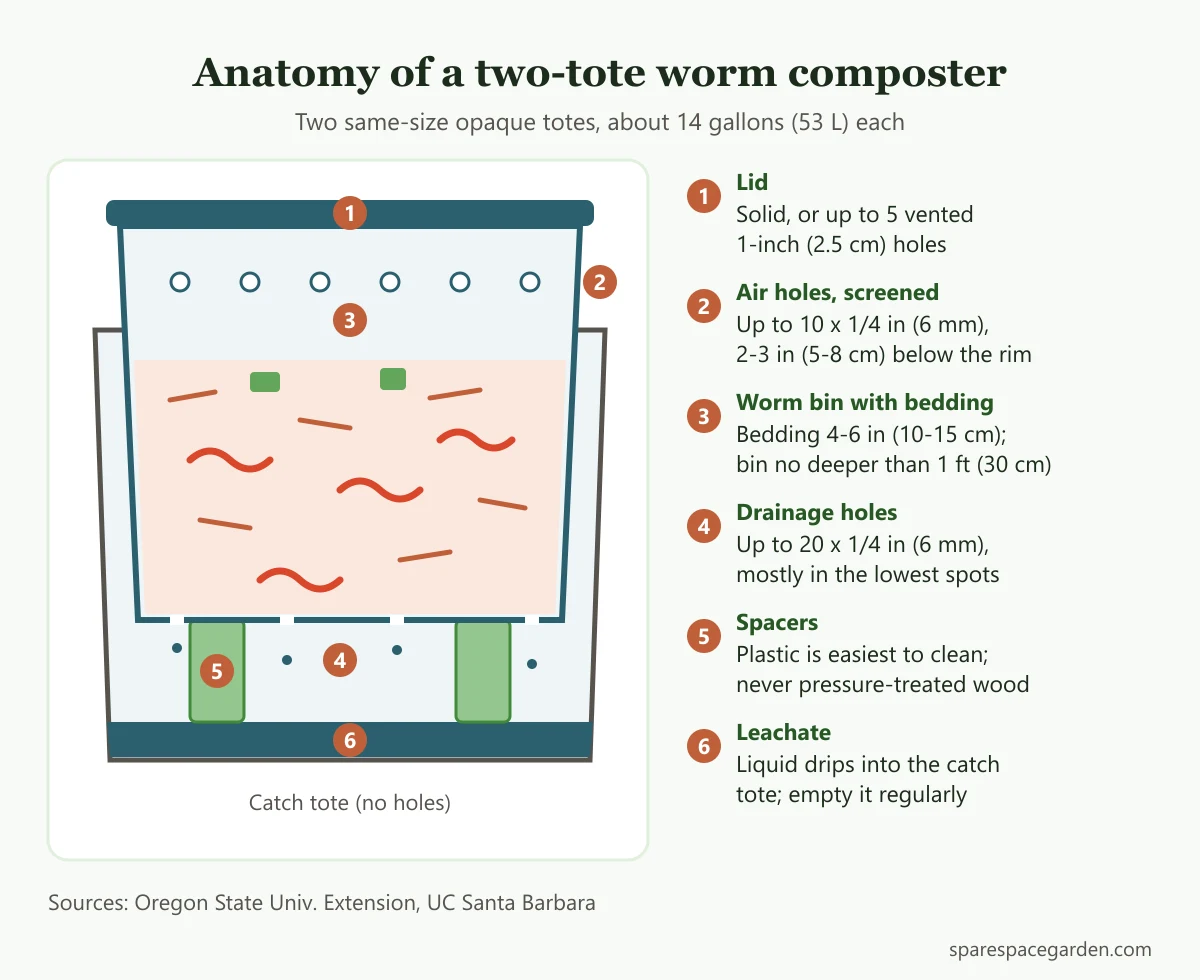 The parts of a two-tote worm bin, with hole sizes and positions.
Tip: Before drilling, set the empty totes where the bin will live. A bin under a sink or on a shelf needs enough clearance to lift the lid and reach in without pulling the whole thing out.
Lid, ventilation and the leachate tray
The guides agree on drainage holes but differ on how much air to let in, especially through the lid:
| Source | Bottom drainage | Side air holes | Lid |
|---|---|---|---|
| Oregon State Extension | Up to 20 × ¼ in (6 mm) | Up to 10 × ¼ in, 2–3 in (5–8 cm) below rim, or 4+ vents of 1 in (2.5 cm) | Optional: up to 5 vented 1-in holes |
| NC State Extension | 6 × ¼ in, evenly spaced | 4 × ½ in (13 mm), or many ⅛-in (3 mm) holes, on upper sides | Tight-fitting, no holes |
| UC Santa Barbara | 8–10 × ⅛ in (3 mm) | ⅛-in holes about every 3 in (8 cm) on all sides | 20–30 × ⅛ in holes |
| US EPA | 4 × ⅛ in near the bottom corners | 2 × 1 in, about 2 in (5 cm) below the top | Not drilled |
NC State's reason for a solid lid is that holes let in light and dry the bedding. Food scraps are mostly water, though, and plastic doesn't breathe, so some bins run wet. A sensible middle path is to start with screened side holes and a solid lid. If the bedding stays soggy even after you mix in dry shredded paper, add a few screened holes to the lid. Oregon State warns not to leave a vented bin out in the rain.
The leachate tray
The catch tote collects the dark liquid that drains from the worm bin, called leachate. Empty it before it rises to the bottom of the worm bin. Oregon State suggests an optional drain plug in the catch tote to make this easier, and the EPA's version pairs an 18-gallon (68 L) worm bin with a shallow tub about 5 inches (13 cm) high underneath. Whether the liquid is safe to use on plants is debated; our guide to indoor worm composting covers what the sources say.
You can also skip the second tote. Larimer County's design uses a single 16-gallon (61 L) tote with ¼-inch holes in the lid, upper sides and bottom, raised on small wood blocks over a tray.
How to build a wooden worm box
Wood suits a larger bin or one that will live outdoors. Oregon State says wooden bins breathe, so they have fewer odor and moisture problems than plastic, but they are heavy, and wheels make them easier to move. Its common design is a box 1 foot deep, 2 feet wide and 3 feet long (30 × 61 × 91 cm), with drainage holes in the bottom and a hinged lid. That is the 6-cubic-foot (170 L) size from the table above.
Guidelines for a wooden box:
- Wood: exterior-grade plywood or construction-grade lumber. Never pressure-treated, and skip cedar, redwood and cypress.
- Finish: Oregon State suggests painting only the outside, ideally white to reflect light and keep the bin cool, and leaving the inside bare.
- Drainage: WSU Whatcom County's plan drills twelve ½-inch (13 mm) holes through a ½-inch plywood floor framed with 2×4s, and fits the lid with two hinges. Set the box on a tray or somewhere that can get wet.
- Pests: Oregon State says an outdoor bin should have no holes or gaps larger than ¼ inch (6 mm) to keep rodents out.
- Location: Oregon State suggests the north side of a building, sheltered from rain and wind. Worms do best at 55–77°F (13–25°C) and survive about 40–90°F (4–32°C).
Watch out: Old pallets and scrap lumber are tempting for a free bin. If you can't confirm the wood is untreated, leave it out.
First fill: bedding and worms
Once the bin is built, filling it takes a few minutes. These are the short steps; our guide to starting a worm farm covers the first month in detail.
- Add bedding. Shredded newspaper, small pieces of cardboard, coir or partly rotted leaves, 4–6 inches (10–15 cm) deep, per Oregon State.
- Moisten it. Aim for a wrung-out sponge. NC State says a squeezed handful should release only two or three drops.
- Add grit. NC State suggests mixing in a handful of garden soil.
- Add the worms. NC State recommends about 1 pound (0.45 kg) of red wigglers per square foot of surface.
- Wait, then feed lightly. The EPA lets new worms settle for a day before feeding. Oregon State suggests starting with ¼ to ½ pound of scraps per pound of worms per week.
Common DIY worm bin mistakes
Most problems with a homemade worm composter trace back to the build:
- A clear tote. Worms avoid light, so they won't work the surface where you add food.
- A bin deeper than 1 foot (30 cm). The lower layers can run short of oxygen.
- Air holes below the catch tote's rim. Once the totes are nested, those holes are blocked.
- Unscreened holes. Flies get in and worms get out.
- No spacers. The worm bin ends up sitting in its own leachate.
- Treated or aromatic wood, including the blocks under the bin.
- A spot next to the washer or dryer. Oregon State notes that vibration can make worms try to escape.
Frequently asked questions
How many holes does a worm bin need?
It varies by source. Plans range from 4 to 20 small drainage holes in the bottom of the worm bin, and from two 1-inch (2.5 cm) holes to a few dozen small ones high on the sides. Oregon State's version is up to 20 ¼-inch (6 mm) drainage holes and up to 10 ¼-inch side holes. Screen the side holes so flies stay out.
Should a worm bin lid have holes?
Not necessarily. NC State recommends a tight-fitting lid with no holes to keep the bin dark and moist, while Oregon State lists up to five vented 1-inch (2.5 cm) lid holes as optional. Start with a solid lid and add screened holes only if the bin stays too wet.
What size tote is best for a worm bin?
For a household of two or three, Oregon State suggests a 14-gallon (53 L) tote, which handles about 2 pounds (0.9 kg) of scraps a week. UC Santa Barbara's build uses 10-gallon (38 L) totes. Whatever the size, wide and shallow beats tall and narrow.
Can I make a worm composter from one bin?
Yes. Larimer County's design uses a single 16-gallon (61 L) tote with ¼-inch holes, raised on small blocks over a tray. The second tote mainly makes the leachate easier to collect and keeps drips off the floor.
Is a wooden or plastic worm bin better?
Plastic is cheaper, lighter and easier to fit under a sink. Wood breathes, so Oregon State notes it has fewer moisture and odor problems, but it is heavy and must be untreated. For a balcony or apartment, a tote is usually the practical pick.