Indoor worm composting turns kitchen scraps into rich castings inside an apartment, using a bin small enough to fit under the sink or in a closet. Red wiggler worms do the work, and a well-run bin smells like damp forest soil, not garbage.
The catch is that an indoor bin lives close to you. Odors, fruit flies and drips are the three complaints that make people give up, and all three come from the same few causes: too much food, too much water, or food left uncovered. Get those right and the bin is easy to live with.
Quick answer: Keep the bin in a dark spot that stays around 55–77°F (13–25°C), away from heaters and sunny windows. Bury every feeding under 1–2 inches (2.5–5 cm) of damp bedding, add food only after the last batch is gone, and keep the bedding as damp as a wrung-out sponge. Those three habits prevent most smells and fruit flies.
This guide is about living with a bin indoors. If you still need a container, see how to make a DIY worm composter, and for the first weeks of setup, read starting a worm farm.
Where to keep an indoor worm bin
Pick a spot that is dark, out of the way and steady in temperature. NC State Extension's vermicomposting guide lists kitchens, closets, bathrooms, basements, garages and balconies as workable locations. The Brooklyn Botanic Garden suggests a closet or the cabinet under the sink, and the EPA notes that an out-of-the-way spot makes sense because the bin produces both compost and liquid.
Under the kitchen sink
This is the most convenient place, since scraps go straight from the cutting board into the bin. Measure the cabinet first so you can lift the lid and dig in without pulling the whole bin out. If the cabinet gets warm when the dishwasher runs, choose another spot.
A closet, pantry or laundry room
These rooms tend to stay dark and stable, which worms prefer. Indiana's Department of Environmental Management advises keeping bins away from drafts, heating vents and windowsills, because temperature swings most in those places. Set the bin on a tray or old baking sheet to catch any drips.
A balcony in mild weather
A balcony works for part of the year if the bin sits in full shade. NC State says to keep bins out of direct sun, and University of California Cooperative Extension says to place the bin where it will not freeze or overheat. In practice, that means bringing it inside during heat waves and hard frosts.
The temperature range worms need
Sources give slightly different ranges, but they overlap closely:
- NC State Extension: 59–77°F (15–25°C), with tolerable limits of 32–95°F (0–35°C)
- Indiana DEM: 55–77°F (13–25°C)
- Brooklyn Botanic Garden: 55–75°F (13–24°C)
- UC Cooperative Extension: 50–80°F (10–27°C)
Most heated and air-conditioned homes fall inside these ranges year-round, which is why indoor bins are easier to manage than outdoor ones. On a hot day, NC State suggests adding dry bedding or a container of ice, and UC suggests ice cubes or cold water.
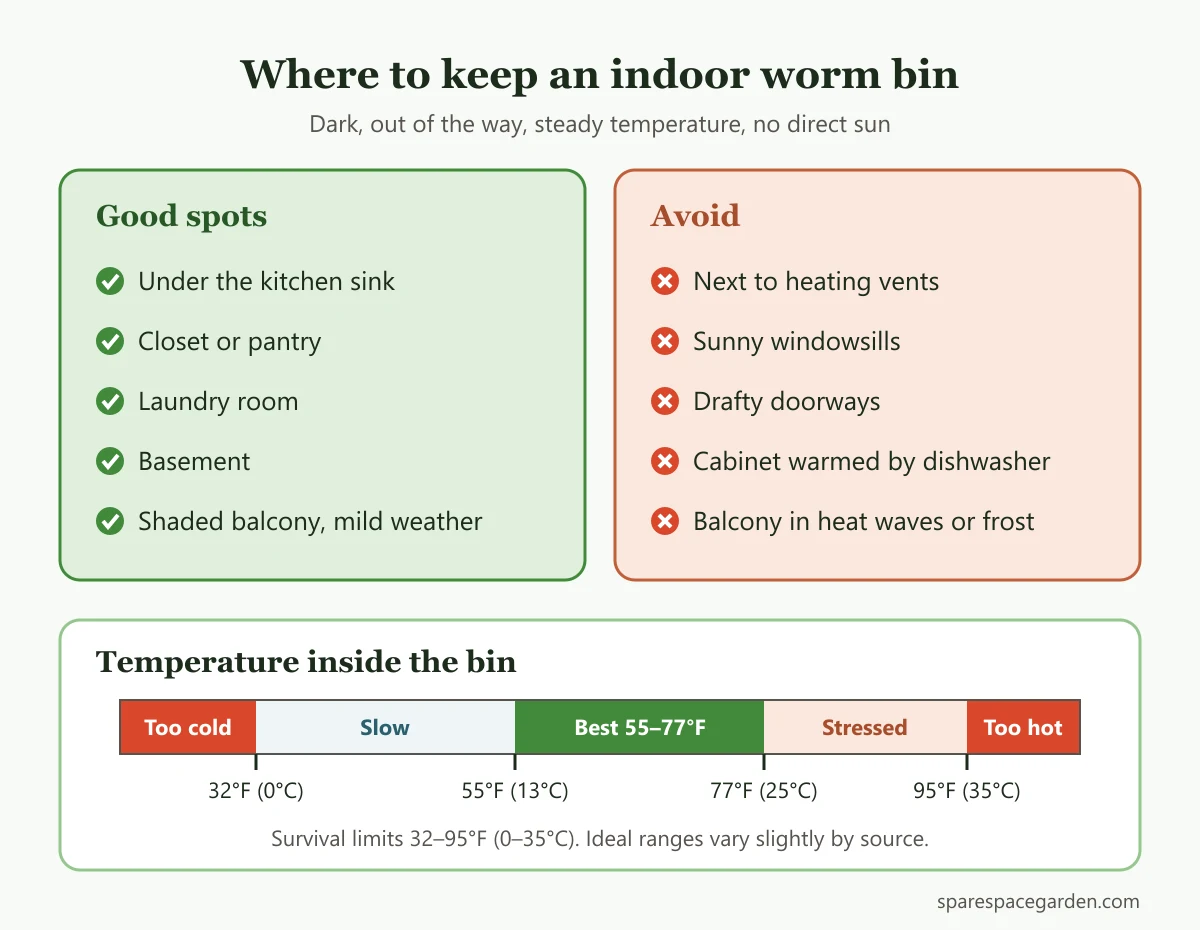 Where to put an indoor worm bin, and the temperature range red wigglers need.
Why worm bins smell, and how to keep yours odor-free
A healthy bin smells earthy. NC State vermicomposting specialist Rhonda Sherman lists an inside that "smells earthy like forest" as the first trait of a healthy worm bin. A sour, rotten or ammonia smell means part of the bin has run short of oxygen, and food is rotting faster than the worms can eat it.
The usual causes:
- Overfeeding. NC State says 1 pound (0.45 kg) of worms eats up to 2 pounds (0.9 kg) of food scraps per week. Anything beyond that sits and rots.
- Too much water. Soggy bedding fills the air spaces worms and helpful microbes need.
- The wrong food. Meat, dairy and oily foods break down into the worst smells.
- Food left on the surface. Exposed scraps smell and attract flies.
To fix a smelly bin, stop feeding. NC State suggests a 2-week pause when overfeeding is the cause. Gently fluff the bedding to let air back in, mix in a few handfuls of dry shredded paper, and pull out any food the worms are ignoring.
Between feedings, store scraps somewhere cold. The Brooklyn Botanic Garden suggests the fridge, and NC State says scraps can be kept a few days in a lidded container or frozen.
How to prevent fruit flies in a worm bin
Fruit flies usually ride in on fruit peels and then breed on any food that is exposed and fermenting. Prevention is mostly about keeping food buried and portions small.
- Bury every feeding. NC State recommends covering food completely with 1–2 inches (2.5–5 cm) of bedding. UC Cooperative Extension goes further and suggests always keeping a 4–6 inch (10–15 cm) layer of fresh bedding over the worms and food.
- Feed less, in smaller pieces. Chopped scraps disappear faster, so they spend less time fermenting.
- Wash peels or leave them out. The Brooklyn Botanic Garden suggests this, along with burying food and adding dry bedding.
- Keep scraps cold until feeding day. Scraps waiting in the fridge or freezer aren't fermenting on the counter.
- Catch the adults. The Brooklyn Botanic Garden also suggests a fruit fly trap near the bin.
If flies have already moved in, UC's troubleshooting advice is to add 4–6 inches of bedding on top and, if overfeeding is the cause, stop feeding for a few weeks. Small flies hovering around houseplants rather than the bin are more likely fungus gnats; see our guide to getting rid of gnats in potted plants.
Tip: Feed a different corner or section each time. UC Cooperative Extension notes this makes harvesting easier later, and it also lets you check whether the last meal is gone before adding more.
Managing moisture and leachate
Aim for bedding as damp as a wrung-out sponge. NC State puts the target at about 80% moisture, with an acceptable range of 60–90%. When you squeeze a handful, only a couple of drops should come out. NC State also advises misting with a plant sprayer rather than pouring water in.
Plastic bins tend to get wetter over time, because food scraps are mostly water and plastic doesn't breathe. UC Cooperative Extension says to add dry bedding to a plastic bin to soak up excess moisture. If liquid is pooling at the bottom, NC State suggests leaving the lid off for a couple of days and adding dry bedding.
The dark liquid that drains out of a bin is called leachate, and it isn't the same as worm tea. Sherman's NC State slides warn that leachate may contain pathogens, byproducts of decomposition without oxygen, and salts. They say not to use it on food crops and don't recommend it for houseplants. The EPA and Oregon State University Extension suggest using the drained liquid around garden plants, with Oregon State saying to dilute it first. Indoors, the simplest approach is to keep the bedding dry enough that little drains, and pour away anything that collects in the tray.
Indoor bin problems at a glance
| What you notice | Likely cause | What to do |
|---|---|---|
| Sour or rotten smell | Overfeeding or bedding too wet | Stop feeding for about 2 weeks, fluff bedding, add dry paper |
| Fruit flies around the bin | Food exposed or too much food | Add 4–6 in (10–15 cm) of bedding on top, feed less |
| Liquid pooling at the bottom | Too much water or very wet food | Leave the lid off a couple of days, mix in dry bedding |
| Bedding dry and worms sluggish | Not enough moisture | Mist with a sprayer until damp, not dripping |
| Worms dying | Temperature extremes, or acidic or salty food | Move the bin, remove the offending food |
| Food still there after a week | More food than the worms can eat | Wait until it's gone before feeding again |
What to feed indoor worms, and what to leave out
Red wigglers (Eisenia fetida) eat most plant-based kitchen scraps. For more on the species and why garden earthworms won't work in a bin, see our guide to red composting worms.
Good foods, drawn from NC State, the EPA and Indiana DEM:
- Vegetable and fruit scraps, chopped small
- Coffee grounds and paper coffee filters
- Tea bags with the staples removed (paper bags only, not plastic)
- Crushed, rinsed eggshells
- Plain bread and pasta in small amounts
Foods to keep out of an indoor bin:
- Meat, fish, bones, dairy, grease and oily foods
- Pet feces
- Citrus, onions, garlic and hot peppers (NC State lists all of these; the Brooklyn Botanic Garden and Oregon State say to limit citrus and strongly flavored foods)
- Very salty or sugary foods, and vegetables pickled in vinegar
- Produce stickers and plastic tea bags
Chop large scraps into small pieces. Indiana DEM explains that worms have no teeth and grind food in a gizzard, so smaller pieces break down faster.
A weekly routine for indoor worm composting
Once the bin is established, indoor worm composting takes only a few minutes a week. A simple routine:
- Collect scraps all week in a small lidded container in the fridge or freezer. The EPA suggests rinsing the scrap container each week.
- Check last week's food before adding anything. If most of it is gone, feed. If not, wait a few days.
- Bury the new scraps in a fresh section and cover them with 1–2 inches (2.5–5 cm) of bedding.
- Squeeze a handful of bedding. Mist it if it feels dry, or mix in dry shredded paper if it drips.
- Look at the lid and walls. Sherman's NC State checklist counts fewer than six worms on the sides and lid as a healthy sign. Many more suggests conditions inside need fixing.
- Empty the drip tray if anything has collected.
Every month or two, top up the bedding. UC Cooperative Extension suggests adding fresh bedding every 1–3 months, and NC State notes that worms eat their bedding, so it shrinks over time.
Going on vacation? NC State notes that an established bin may only need feeding every 2 to 3 weeks, depending on how many worms it holds, and suggests spreading a ½-inch (1.3 cm) layer of food and covering it with 2 inches (5 cm) of moist shredded paper before you leave.
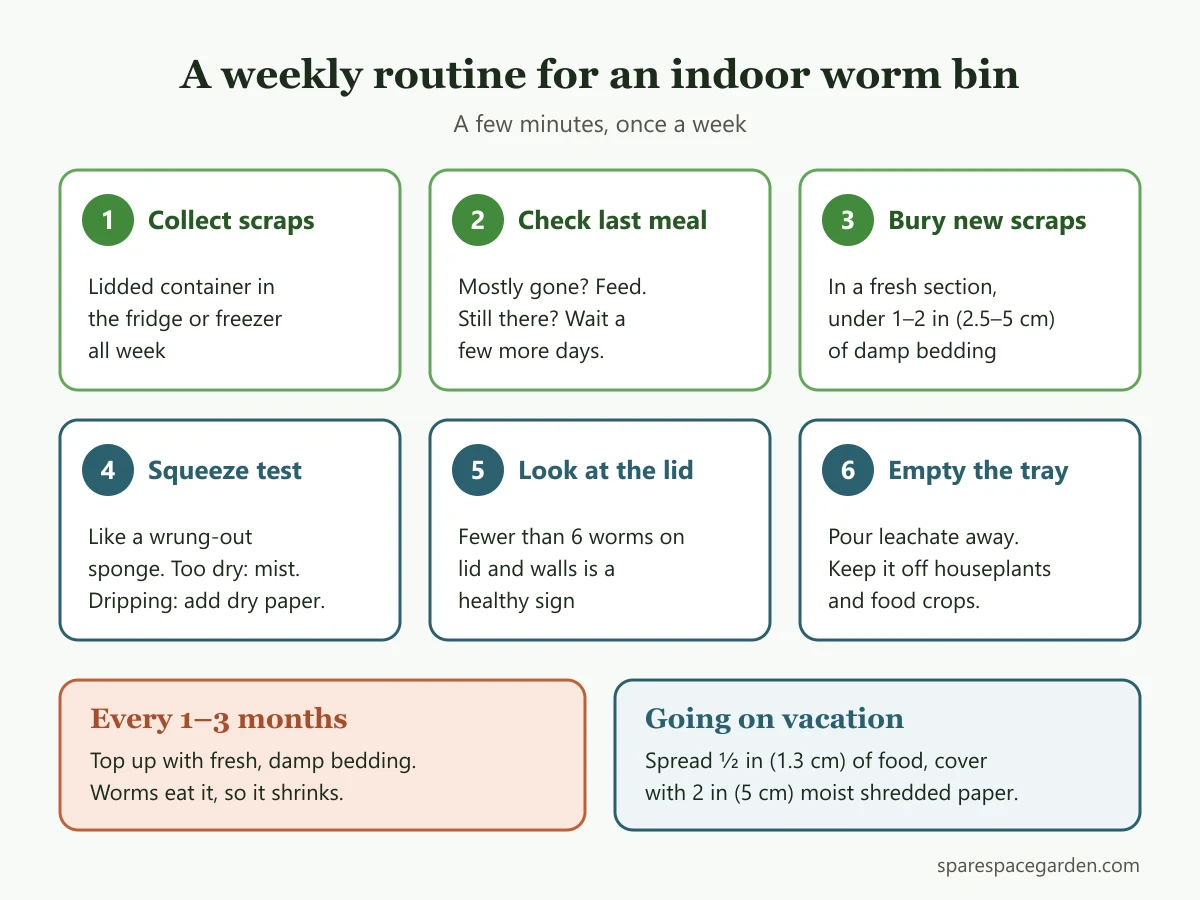 A simple weekly routine that keeps an indoor worm bin odor-free.
Using worm castings on houseplants and herbs
Castings are ready to harvest after about 3 to 6 months, according to UC Cooperative Extension and Indiana DEM. Harvest methods are covered in our guide to starting a worm farm. Before bringing castings near your houseplants, pick out worms and the small, lemon-shaped egg capsules, as NC State advises, and return them to the bin.
How much to use:
- When repotting: Indiana DEM suggests ¼ worm compost to ¾ potting soil and warns that too much can make the soil hard. Oregon State University Extension suggests blending castings with potting soil at about 20%.
- For established plants: Sherman's NC State slides suggest 2 tablespoons (about 30 mL) per quart (about 1 L) of potting mix, spread around the base of the plant and watered in, repeated every 2–4 weeks.
- For seedlings: the same slides suggest 1 part castings to 4 parts potting mix.
For kitchen herbs like basil, parsley and chives, work castings into the soil rather than leaving them on the surface. If you make vermicompost tea, NC State's recipe is 2 tablespoons of castings steeped in 1 quart of water for a day, used within 24 hours, and kept off the edible parts of plants unless you're sure it's free of pathogens. Castings complement a regular feeding plan rather than replacing it, so see our guide to fertilizer for potted plants for the rest, and the best herbs to grow indoors for plants that suit a sunny kitchen.
Frequently asked questions
Does indoor worm composting smell?
A well-kept bin should not. NC State says a well-maintained bin shouldn't smell or attract pests, and the Brooklyn Botanic Garden describes worm bins as mostly odorless. A bad smell almost always means too much food or too much water, so pause feeding and add dry bedding.
What temperature is too cold or too hot for a worm bin?
NC State gives tolerable limits of 32–95°F (0–35°C), but worms do best between about 55°F and 77°F (13–25°C). Near the limits they slow down or die, so move the bin indoors or to a cooler room before temperatures get extreme.
Why are worms crawling up the sides of the bin?
A few worms on the walls is normal. Lots of them means something inside is off: check the temperature, squeeze the bedding for moisture, and remove any recent food that might be too acidic or salty. UC Cooperative Extension lists temperature extremes and acidic or salty food as reasons worms die.
Are worm castings safe for edible herbs?
Yes, mixed into the potting soil. Keep leachate away from edible plants entirely, and apply any castings tea to the soil rather than the leaves, as NC State advises for edible crops.