Growing chives in pots is about as close to foolproof as herb growing gets. Chives are hardy perennials in the onion family, so one pot can keep producing for years: you cut the leaves, they grow back, and the clump slowly gets bigger.
The few things that do matter are a pot big enough for the clump, steady moisture, regular cutting, and a plan for winter. This guide covers both common chives and garlic chives, from seed or a division through to splitting an old clump and moving a pot onto a windowsill.
Quick answer: Use a pot at least 8 inches (20 cm) wide and deep with drainage holes, in full sun or light shade. Start from a nursery plant or a division for the fastest harvest, cut leaves 1 to 2 inches (2.5 to 5 cm) above the soil, and divide the clump every 2 to 4 years.
Common chives vs garlic chives
Two different plants are sold as "chives," and both do well in containers.
Common chives (Allium schoenoprasum) have thin, hollow, round leaves and a mild onion flavor. The RHS describes leaves about 12 inches (30 cm) tall and pink pompom flowers in late spring and summer. Johnny's Selected Seeds lists them as hardy in USDA zones 3 to 9.
Garlic chives (Allium tuberosum), also called Chinese chives, have flat leaves, a mild garlic taste and starry white flowers. University of Illinois Extension puts them at about 12 to 18 inches (30 to 45 cm) tall and says their culture is the same as common chives. NC State Extension rates them hardy in zones 3 to 9 as well.
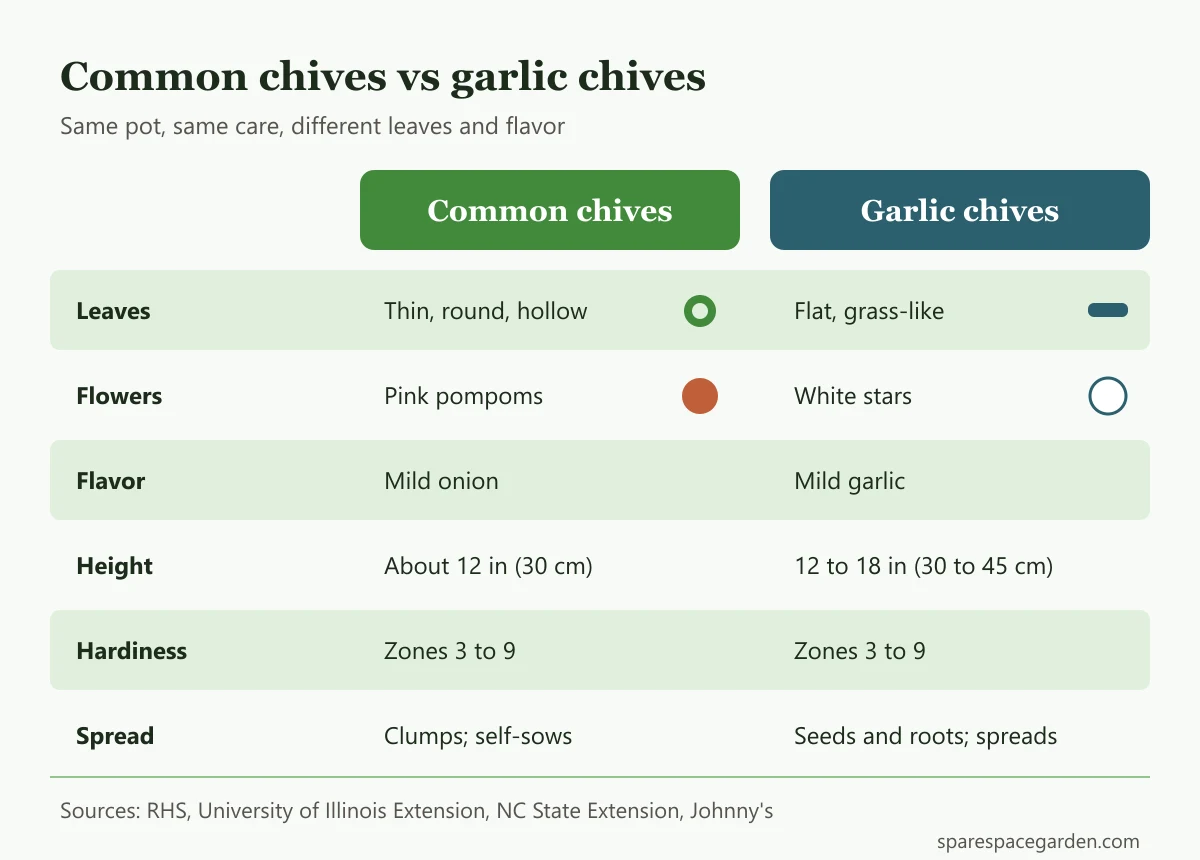 Common chives and garlic chives side by side. Both grow the same way in a pot.
The main practical difference is how freely garlic chives spread. NC State Extension notes that they self-seed readily and spread by underground rootstocks, and it suggests deadheading or keeping them in pots to limit spread. A container is the natural home for them on a balcony.
Growing chives in pots: size and potting mix
The RHS recommends a container at least 8 inches (20 cm) wide and deep when growing chives in pots. That's a minimum for one clump. A wider pot gives the clump room to spread before it needs dividing, and it holds more mix, so it dries out a bit slower in summer.
Chives aren't fussy about soil, but NC State notes that root rot can occur in poorly drained soil. So focus on drainage:
- Drainage holes are required. The University of Maryland Extension container guide also advises emptying saucers after watering and raising pots on feet or a brick.
- Skip the gravel layer. UMD notes that gravel or broken pot pieces in the base don't improve drainage and may raise the water level inside the pot.
- Use a good potting mix rich in organic matter. Illinois Extension says chives grow best in soil high in organic matter. The RHS suggests a loam-based compost for containers. If you mix your own, see our guide on how to make potting soil.
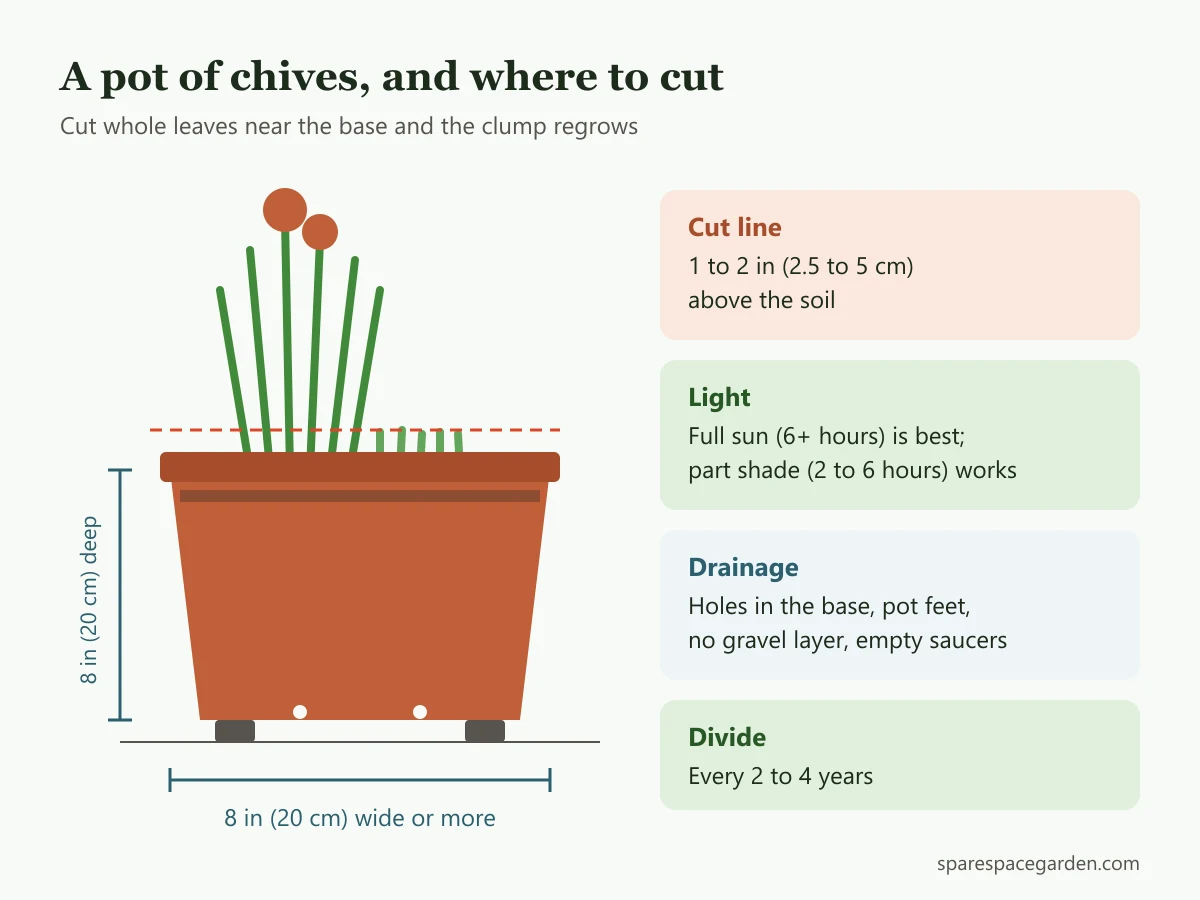 Pot setup for chives, and where to cut when you harvest.
Terracotta, plastic and glazed pots all work. Terracotta dries out faster, which suits a shaded spot or a cool climate better than a hot, sunny balcony.
Seeds, nursery plants or divisions: how to start
You have three ways in, and they differ mostly in how long you wait for the first cut.
| Starting method | When to start | First harvest | Notes |
|---|---|---|---|
| Seed | Indoors 6 to 10 weeks before last frost, or sow outdoors in spring | About 60 days after sowing | Cheapest; slow at first |
| Nursery plant | Any time in the growing season; spring is ideal | About 30 days after planting | RHS says they're often sold in 3.5 inch (9 cm) pots |
| Division from a clump | Spring or fall | A few weeks, once the plant settles | Fastest; free if a friend has an old clump |
The harvest timings come from Utah State University Extension, which says you can harvest as early as 60 days after seeding or 30 days after transplanting.
Starting chives from seed
- Fill a small pot or cell tray with moist seed-starting mix.
- Sow a pinch of seeds together. Johnny's sows several seeds per cell and thins to 3 or 4 seedlings, since chives grow as small clumps anyway.
- Cover with about 1/4 inch (6 mm) of mix. The RHS gives 1/4 to 1/2 inch (0.5 to 1 cm).
- Keep the mix slightly moist and warm. Johnny's lists germination in 7 to 14 days at 65 to 70°F (18 to 21°C).
- Move the clumps into the final pot once they're growing strongly. The RHS transplants at about 4 inches (10 cm) tall.
Timing advice varies: Johnny's starts seeds 6 to 8 weeks before the last frost, and NC State gives 8 to 10 weeks. Illinois Extension warns that seed can be slow and may take 4 to 6 weeks to produce transplants. If your seedlings stretch toward the window, our page on leggy seedlings explains why.
Planting a nursery plant or a division
Plant at the same depth the clump was growing before, firm the mix around it and water well. If you're splitting an existing clump, Illinois Extension recommends sections of about 4 to 6 bulbs each. Several divisions can share one wide pot.
Sun, water and feeding
Care is where growing chives in pots differs most from growing them in a bed, because a container dries out and runs out of nutrients faster.
Sun. NC State lists chives for full sun (6 or more hours of direct sun) or partial shade (2 to 6 hours). Full sun gives the thickest growth, but chives are one of the few edible herbs that still produce on a balcony with a few hours of shade.
Water. The RHS points out that chives in containers dry out faster than those in the ground, so water during the growing season to keep the compost evenly moist. Utah State adds that chives survive drought, but growth and yield drop. In practice, water when the top of the mix feels dry, and let the excess drain away. Don't leave the pot standing in water.
Feeding. Chives don't need much. Utah State says they need little extra fertilizer, while Illinois Extension notes that plants harvested often benefit from supplemental fertilizer during the season. A reasonable middle path for a pot that gets cut every few weeks is an occasional diluted liquid feed during spring and summer, following the product label. Our guide to fertilizer for potted plants covers the options.
Tip: Keep a pair of scissors next to the pot. Chives respond to regular cutting, and a clump that's never cut gets tough and floppy.
How to harvest chives (and eat the flowers)
Cutting the leaves
Cut leaves 1 to 2 inches (2.5 to 5 cm) above the soil, the height Utah State recommends. Illinois Extension cuts a little lower, at about 1 inch (2.5 cm). Either way, cut whole leaves near the base rather than snipping the tips, which leaves brown, chopped ends behind.
How often depends on the plant's age. Utah State suggests 3 to 4 harvests in the first year, then cutting back monthly in later years. Illinois Extension says regular harvesting through the season keeps leaves from getting tough. The RHS adds that frequent picking produces more new leaves and recommends cutting in the morning.
Chives are best used fresh. Illinois notes that dried leaves lose color and quickly absorb moisture, and that the leaves can also be frozen.
Using the flowers
Chive flowers are edible, and they're one of the reasons to grow the plant. The RHS suggests picking newly opened flower heads and scattering the individual florets over food. NC State describes the flavor as mildly bitter and advises eating them raw in small amounts. The stalks under the flowers are a different story: Utah State calls the flowers and stalks unpalatable, so pull the florets off and discard the stem.
After flowering, you have two options from the RHS: snip the flower stalks off at the base, or cut the whole clump back to about 2 inches (5 cm) for a flush of fresh leaves in a few weeks. Remove faded flowers before they set seed, since Illinois warns that chives self-sow and can spread.
Watch out: NC State Extension lists common chives as a problem for cats, dogs and horses. Keep pots of either type where pets can't chew them.
Dividing an old clump
Every few years, a potted clump gets crowded. You'll notice thinner leaves, fewer of them, and a pot that dries out within a day. That's the signal to divide.
Sources differ a little on how often. Utah State and Illinois recommend every 2 to 3 years, and the RHS and Johnny's suggest every 3 to 4 years. In a pot, where the roots fill the space faster, lean toward the shorter end.
- Pick your timing. Spring is the most common choice; the RHS also accepts fall.
- Water the pot a few hours before, then slide the clump out.
- Pull or cut the root ball apart into sections of 4 to 6 bulbs, as Illinois Extension suggests.
- Replant one section in the same pot with fresh mix, and pot up or give away the rest.
- Let it settle. Utah State advises giving divisions several weeks to reestablish before you harvest again.
If you'd rather not divide, the RHS says you can move a large clump into a slightly bigger pot every few years instead.
Winter: outdoors vs on a windowsill
Chives are cold-hardy, and outdoors they simply die back in late fall and regrow in spring. A potted clump on a balcony can be left to do the same. The RHS notes the harvest season runs from late spring until the foliage dies back in autumn.
Moving chives indoors for winter harvests takes a bit of timing. The RHS suggests potting up a clump and keeping it on a sunny windowsill to extend picking. Illinois Extension is more specific: it advises digging clumps after a freeze, in December or January in Illinois, and warns that plants potted in fall for indoor growing don't perform as well and tend to get leggy. In other words, let the clump feel some real cold first, then bring it inside to a bright window.
A few points for indoor chives:
- Light: use your sunniest window. Illinois notes that the variety 'Grolau' was developed for indoor growing and is less prone to legginess.
- Water: keep moisture even, but don't let the pot sit wet.
- Back outside: Utah State's approach is to bring divisions indoors in autumn and replant them outside the following spring.
For a full windowsill setup, see our guide to herb window gardens or our list of the best herbs to grow indoors.
| Season | Outdoor pot | Indoor pot |
|---|---|---|
| Spring | New growth; divide crowded clumps | Move back outside after hardening off |
| Summer | Harvest every few weeks; enjoy flowers | Outdoors |
| Fall | Leaves die back; stop cutting | Pot up a division; leave it outside until after a freeze |
| Winter | Dormant; regrows in spring | Sunny window; light, regular cuts |
Frequently asked questions
Do chives come back every year in a pot?
Yes. Chives are hardy perennials, and Johnny's lists common chives as hardy in zones 3 to 9. A potted clump dies back in winter and regrows in spring. Dividing it every few years keeps it productive.
Can you grow chives from grocery store chives?
Cut chive leaves from a store won't regrow on their own, because they have no roots. A potted living herb from a supermarket is a different case: you can treat it like a small nursery plant, split the crowded clump into a few sections and pot them up.
Why are my potted chives turning yellow?
Common causes are a pot that's waterlogged, a clump that's too crowded, or a plant that's simply dying back for the season in fall. Check that water drains freely, divide old clumps, and give the plant some feed if it's been cut often. Illinois Extension notes that frequently harvested plants benefit from extra fertilizer.
How tall should chives be before cutting?
Wait until there's a good amount of growth to take; the RHS transplants seedlings at about 4 inches (10 cm), and you can start cutting established clumps once they're well above that. Always leave 1 to 2 inches (2.5 to 5 cm) of stem so the plant can regrow.
Can garlic chives and common chives share a pot?
They can, since their care is the same. But garlic chives spread more aggressively by seed and roots, according to NC State, so they may crowd out the common chives over time. Separate pots are easier to manage.