Starting a worm farm is mostly about patience. The setup takes an afternoon: a bin, damp shredded paper and a pound or so of red wiggler worms. The first two months are when most new bins succeed or fail, because the worms are settling in and can't yet eat as much as you'd like to give them.
The usual beginner mistake is feeding too much, too soon. Go slowly for the first few weeks and the bin builds up to a steady routine, with the first castings ready to harvest in about 3 to 6 months.
Quick answer: Fill the bin half to three-quarters full with shredded paper damp as a wrung-out sponge. Add about 1 pound (0.45 kg) of red wigglers per square foot (0.09 m²) of bin surface, wait a few days, then bury a small first meal of about 1 quart (1 L) of scraps. Feed again only when it's gone. Expect to harvest after 3 to 6 months.
This article covers the first two months. For where to keep a bin indoors and how to stop odors long-term, see indoor worm composting.
Choosing a bin: tray system or simple tote
You can buy a bin or make one. University of California Cooperative Extension's worm composting guide says the bin should have a tight-fitting lid, ventilation holes in the sides, and a way to drain excess liquid, through holes in the bottom or a spigot. Any bin that meets those needs will work.
| Stacking tray system | Simple plastic tote | |
|---|---|---|
| Cost | Higher | Low, often a tote you already own |
| Setup | Ready to use | Drill air and drainage holes |
| Harvesting | Worms move up into new trays, so separating them is easier | Push castings aside or sort by hand |
| Drainage | Built-in collection tray, often with a spigot | Needs a second bin or tray underneath |
| Best for | People who want easy harvests | Trying worm composting before spending much |
For a tote, shallow beats deep. Indiana's Department of Environmental Management (IDEM) says red worms feed near the surface, so the container should be 18 inches (46 cm) high or less, and a 3- to 12-gallon (11–45 L) tote is adequate. NC State Extension suggests a depth of 8 to 20 inches (20–50 cm). If you want to build one from two nested bins, our guide to making a DIY worm composter walks through the drilling.
How many worms to buy when starting a worm farm
Size the bin to your food scraps first, then buy worms to match. NC State's rule of thumb is 1 square foot (0.09 m²) of bin surface for each pound (0.45 kg) of food scraps you produce per week. A household making 2 pounds (0.9 kg) a week would use a bin about 2 feet by 1 foot (60 × 30 cm).
For worms, NC State recommends starting with at least 1 pound (about 1,000 worms) of red wigglers per square foot of surface. The same guide says 1 pound of worms can eat up to 2 pounds (0.9 kg) of scraps per week, and IDEM estimates closer to ½ pound (0.23 kg) per day, so sources vary on how much a pound of worms can handle.
| Food scraps per week | Bin surface | Example footprint | Worms to start |
|---|---|---|---|
| 1 lb (0.45 kg) | 1 sq ft (0.09 m²) | 12 × 12 in (30 × 30 cm) | ½–1 lb (0.23–0.45 kg) |
| 2 lb (0.9 kg) | 2 sq ft (0.19 m²) | 24 × 12 in (60 × 30 cm) | 1–2 lb (0.45–0.9 kg) |
| 4 lb (1.8 kg) | 4 sq ft (0.37 m²) | 24 × 24 in (60 × 60 cm) | 2–4 lb (0.9–1.8 kg) |
The low end assumes each pound of worms eats up to 2 pounds a week; the high end follows the 1 pound per square foot rule.
Starting smaller is fine if you're patient. Oregon State University Extension says about 1,000 red worms suit a 2-by-4-foot bin, but even a quarter of that works. IDEM adds that the population can triple in about four months. A small herd simply means smaller meals at first.
Buy Eisenia fetida (red wigglers) from a worm grower, not garden earthworms or nightcrawlers. NC State notes that buying the same amount from a bait shop would take 33 to 38 bait cups. For more on the species, see our guide to red composting worms.
Preparing the bedding: the wrung-out sponge test
Bedding is the worms' home and part of their diet. Shredded black-and-white newspaper is the standard choice. Avoid glossy magazines and colored inserts.
- Tear or shred paper into strips. NC State suggests strips about ½ inch (1.3 cm) wide; IDEM uses 1-inch (2.5 cm) strips.
- Soak it. NC State soaks bedding for 5 to 10 minutes. IDEM soaks newspaper for 24 hours, fully submerged.
- Wring it out. NC State says to squeeze until only 2 to 3 drops come out. It should feel like a wrung-out sponge, damp but not dripping.
- Fluff it. Loose bedding has air pockets that worms need.
- Fill the bin. NC State says about halfway; IDEM and UC Cooperative Extension fill two-thirds to three-quarters full.
- Add a small handful of soil or sand. IDEM explains that worms grind food in a gizzard with small mineral particles.
Coconut coir can replace part or all of the paper. IDEM notes that coir and peat moss need more attention and may need a longer soak because of acidity or salt levels, so mixing coir with paper is a common compromise.
Tip: Make the bedding a day before the worms arrive. That gives you time to drain off extra water and fix the moisture before any worms go in.
Day 1: adding the worms
Spread the worms gently on top of the bedding and let them burrow down on their own. Red wigglers move away from light, so there's no need to bury them. Put the lid on and leave them alone.
Don't feed right away. NC State and IDEM both say to give the worms a few days to settle before the first feeding, and the EPA's indoor bin instructions wait one day. The bedding itself gives them something to eat in the meantime.
The first 30 to 60 days, week by week
This is the stretch where slow feeding pays off. The figure below lays out a typical schedule drawn from extension guidance.
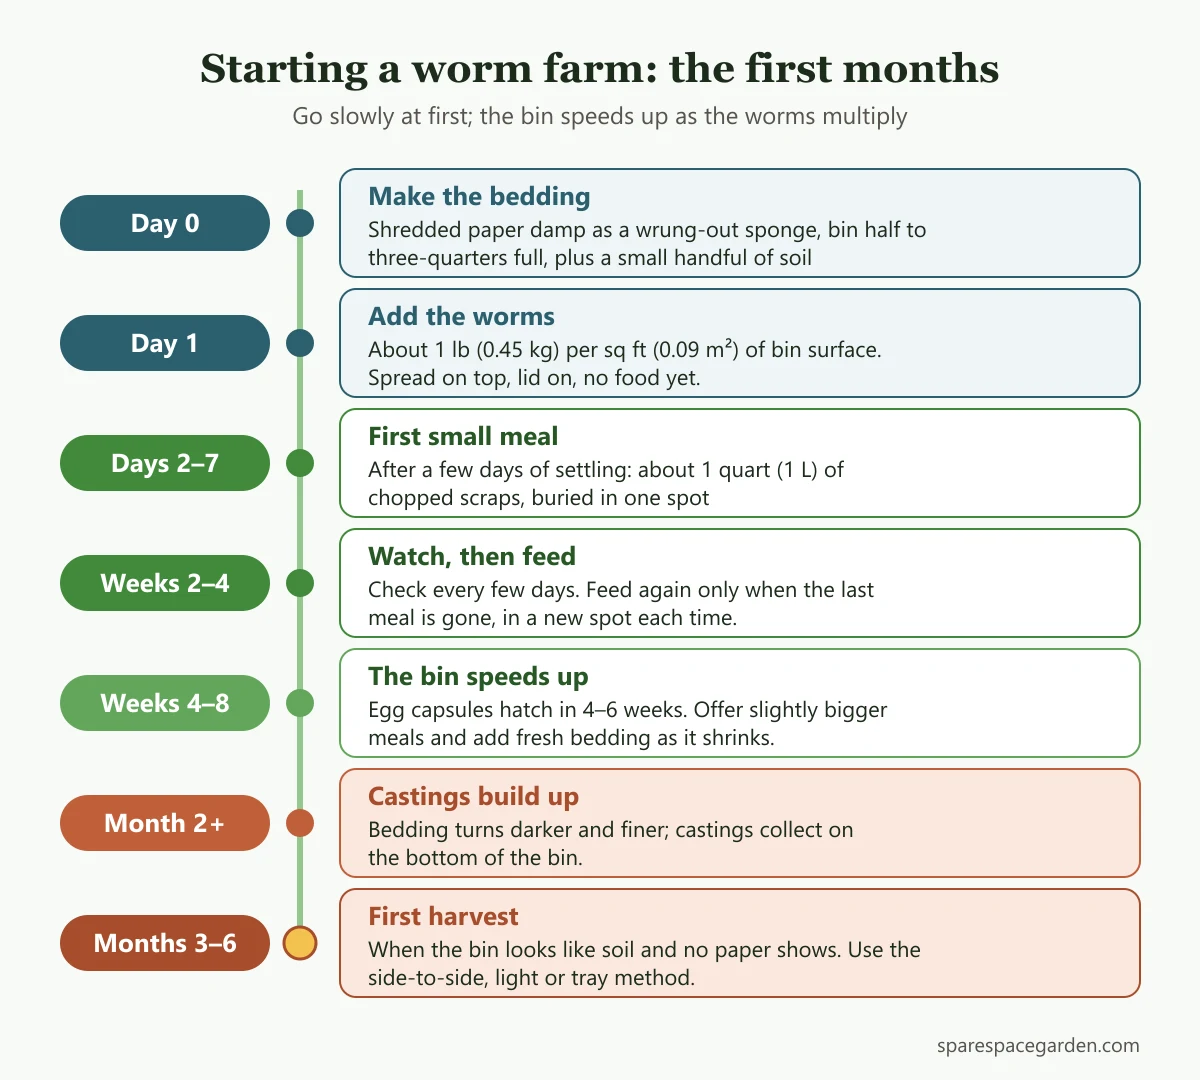 A week-by-week timeline for a new worm bin.
Days 2 to 7: the first meal
UC Cooperative Extension suggests starting with about a quart (roughly 1 L) of fruit and vegetable trimmings. Chop it small, pull back the bedding, bury the food in one spot, and cover it completely. IDEM advises keeping food choices simple at first.
Weeks 2 to 4: watch, then feed
IDEM recommends checking every few days to see how quickly the worms are eating, then adjusting portions. NC State's rule applies from here on: don't add more food until the previous batch is gone. Bury each new meal in a different spot so you can tell what's been eaten.
Weeks 4 to 8: the bin picks up speed
According to NC State's Rhonda Sherman, red wiggler egg capsules hatch in 4 to 6 weeks, releasing 2 to 7 young worms each, and the young reach maturity in 7.5 to 11 weeks. As the population grows, food disappears faster and you can offer slightly larger meals. NC State says to add more bedding within a couple of months, since the worms eat it.
Month 2 and beyond
By now the bedding starts turning darker and finer, and castings collect on the bottom. NC State notes that castings appear after a few weeks, though a full harvest takes longer.
Signs your worm farm is working, or failing
Sherman's checklist of a healthy bin is a good scorecard: the inside smells earthy, food isn't visible, bedding has air spaces, contents are damp but not soggy, worms look moist and glistening, fewer than six worms are on the lid and walls, bedding shrinks over time, and castings build up on the bottom.
| What you see | What it means | What to do |
|---|---|---|
| Earthy smell, food gone within days | Working | Offer slightly larger meals |
| Bedding shrinking, dark castings below | Working | Top up with fresh damp bedding |
| Food untouched after a week | Worms still settling or overfed | Wait before adding more |
| Sour or rotten smell | Overfeeding or too wet | Stop feeding about 2 weeks, add dry bedding |
| Fruit flies | Food exposed | Cover with 4–6 in (10–15 cm) of bedding |
| Liquid pooling at the bottom | Too wet | Leave the lid off a couple of days, add dry bedding |
| Many worms on the lid, or dead worms | Temperature extremes, or acidic or salty food | Move the bin, remove the offending food |
Temperature is the other early failure point. NC State gives an ideal range of 59–77°F (15–25°C), and UC Cooperative Extension says to move the bin if it falls outside 50–80°F (10–27°C).
Watch out: A new bin that smells is almost always overfed. Pausing feeding for a week or two does far less harm than adding more food to "keep the worms going."
Your first harvest: when and how
Most sources put the first harvest at 3 to 6 months. NC State says about 4 months, and UC Cooperative Extension and IDEM give 3 to 6 months. IDEM's sign is a bin that looks like soil, with no shredded paper visible. Before harvesting, you'll need a way to separate worms from castings.
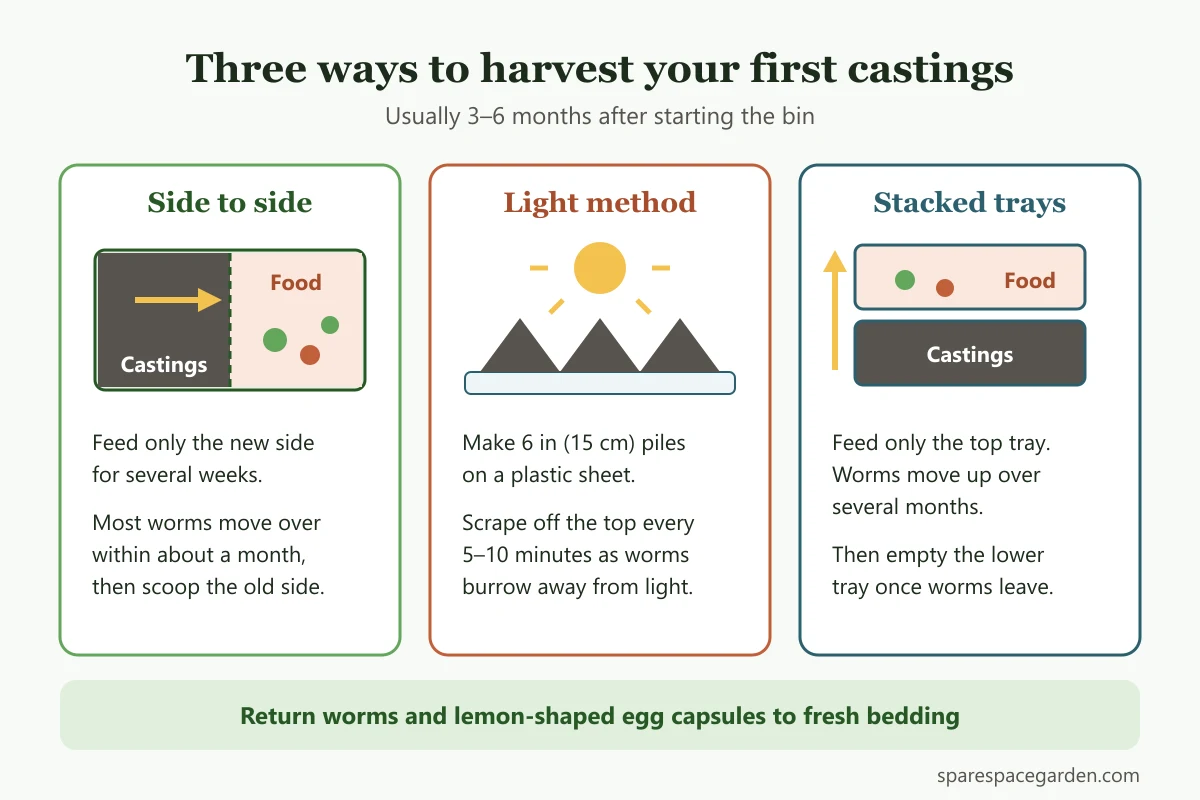 Three common ways to separate worms from finished castings.
Side-to-side method
Push the finished material to one side, add fresh bedding and food to the other, and feed only the new side. NC State says to do this for several weeks. The Brooklyn Botanic Garden says most worms move over within a month. Then scoop out the finished side.
Light method (dump and sort)
Spread the bin contents on a plastic sheet under bright light, in small cone-shaped piles. IDEM suggests piles about 6 inches (15 cm) across and waiting about 10 minutes for worms to burrow down before scraping off the top. NC State suggests scraping the top layer every 5 minutes. Repeat until mostly worms remain. Work steadily: Sherman notes that light can paralyze worms in about 60 minutes.
Tray (vertical) method
Tray systems are built for this. NC State describes stacking a second bin on top and feeding only the upper one for several months until the worms move up. Commercial trays work the same way, one level at a time.
After harvesting, return any worms and small lemon-shaped egg capsules to the bin with fresh bedding. For how much castings to mix into pots, see the castings section of our indoor worm composting guide, and our guide to making potting soil for blending them into a homemade mix.
Frequently asked questions
How long does it take to get compost from a new worm farm?
Most guides give 3 to 6 months for the first harvest. NC State says castings appear within a few weeks, but a full harvest takes about 4 months. A bin started with fewer worms will take longer.
Can I start a worm farm with fewer worms?
Yes. Oregon State Extension says even a quarter of the suggested number works, and IDEM says a few hundred worms will populate a bin over time. Feed in proportion to what they can eat and expect slower results.
How often should I feed worms in a new bin?
Feed only when the last meal is mostly gone. The EPA's instructions suggest feeding once a week, which suits most new bins. NC State notes that an established bin may only need feeding every 2 to 3 weeks, depending on the number of worms.
Can you use earthworms dug from the yard?
No. Garden earthworms and nightcrawlers live deeper in the soil and don't do well in a bin. Composting bins need red wigglers (Eisenia fetida), which live in surface litter.
Is starting a worm farm possible in an apartment?
Yes. A tote fits under a sink or in a closet, and a well-kept bin doesn't smell. See our guides to indoor worm composting and composting in an apartment for other small-space options.