Growing potatoes in grow bags is one of the easiest ways to get a real potato harvest from a patio or balcony. Use a bag that holds 10 to 15 gallons (38–57 L), plant certified seed potatoes on a layer of mix, then keep adding mix as the stems grow. When it's time to harvest, you tip the bag out instead of digging.
The method has a few rules that matter: start with clean seed, keep the mix evenly moist while tubers form, and don't let light reach the potatoes.
Quick answer: Fill a 10–15 gallon (38–57 L) grow bag with 6–8 in (15–20 cm) of mix, set seed potatoes about 1 ft (30 cm) apart, and cover with 6 in (15 cm) more. Add mix as the plants grow, leaving about 6 in (15 cm) of leaves showing. Pick new potatoes 6–8 weeks after planting, or wait until the foliage dies back for mature ones.
What size grow bag do potatoes need?
University of New Hampshire Extension's advice on growing potatoes in containers suggests a container about 2–3 ft (60–90 cm) tall with a 10–15 gallon (38–57 L) capacity, and plans for about 5 gallons (19 L) of mix per plant. UNH also warns that very tall containers are hard to water evenly, because the top dries out long before the bottom.
The RHS potato growing guide sets a smaller minimum: a container at least 30 cm (12 in) wide and deep, with one seed potato per 30 cm (12 in) of pot diameter.
Using UNH's figure of about 5 gallons per plant, here is how many seed potatoes fit common bag sizes:
| Grow bag size | Seed potatoes | Notes |
|---|---|---|
| 5 gallons (19 L) | 1 | Small harvest; dries out fastest |
| 10 gallons (38 L) | 2 | A good size for a balcony |
| 15 gallons (57 L) | 3 | Holds more water, heavy to move once full |
| 20 gallons (76 L) | Up to 4 | Water can struggle to reach the bottom of very deep bags |
Any opaque container with drainage holes works. UNH lists barrels, bins and plastic tubs alongside purpose-made grow bags. Fabric grow bags have two practical advantages: they drain freely, and some have a flap near the base so you can feel for early potatoes. The tradeoff is that fabric loses water through its sides, so the mix dries faster than in a plastic pot.
For the mix, UNH recommends half soilless potting mix and half good compost, and advises against garden soil, which compacts and drains poorly. Iowa State University Extension notes that large amounts of manure may increase potato scab, so skip fresh manure. Our guide to the best potting soil for vegetables covers what to look for in a bagged mix.
Choosing seed potatoes (and why not grocery potatoes)
Start with certified seed potatoes from a garden center or seed catalog. University of Maryland Extension explains that supermarket potatoes can carry disease without showing any symptoms, and Iowa State notes that certified disease-free seed gives the best quality and yields.
Grocery potatoes have a second problem. Colorado State University Extension says store potatoes are typically treated with a sprout inhibitor and often won't grow when planted, and UNH and Iowa State both mention the same treatment. Even if a store potato sprouts on your counter, you're still taking a chance on disease. Utah State University Extension also advises against replanting your own harvested tubers, since viruses and diseases build up over time.
Chitting (pre-sprouting)
Chitting means letting seed potatoes sprout before planting. The RHS describes it as optional but worthwhile for early varieties, while maincrops gain little from it. To chit:
- Stand the seed potatoes in egg cartons or trays with most of the buds facing up.
- Keep them in a bright, frost-free spot.
- Plant after four to six weeks, when the sprouts are about 2 in (5 cm) long.
Maryland Extension describes a similar step it calls green sprouting, which gives plants an earlier start.
Cutting large seed potatoes
Small seed potatoes go in whole. Large ones can be cut. Maryland Extension suggests pieces of 1½ to 2 oz (43–57 g), roughly a 1½ in (4 cm) cube, each with one to three eyes. Let the cut pieces dry for a day or two before planting to reduce rot, as UNH recommends.
Early vs maincrop potatoes: timing
Potato varieties are grouped by how long they take. The RHS says first and second earlies are faster growing and can be ready in as little as 12 weeks, while maincrops stay in the ground until late summer or early fall. Iowa State gives 90 to 120 days after planting for most varieties to mature.
| Type | Harvest | Best for |
|---|---|---|
| First earlies | As little as 12 weeks after planting | Small, thin-skinned new potatoes; eat soon after digging |
| Second earlies | A few weeks after first earlies | New potatoes or a slightly larger crop |
| Maincrops | Late summer to early fall; 90–120 days for most varieties | Larger potatoes for storage |
Each group has a case for containers. UNH prefers mid- or late-season varieties in containers because they keep forming tubers over a longer period. The RHS points out that early varieties are less affected by blight. If you only have room for one or two bags, earlies give you a quick crop and free up the space for something else.
For planting time, Utah State recommends planting 2 to 3 weeks before your last spring frost once the soil is at least 50°F (10°C), while Maryland Extension gives a minimum soil temperature of 45°F (7°C). A grow bag has one advantage here: you can keep it in a frost-free spot, as the RHS suggests, until frost risk passes.
Growing potatoes in grow bags, step by step
Pick a spot with at least 6 to 8 hours of direct sun, which UNH recommends, before you fill the bag. A full, wet bag is hard to move.
- Roll down the sides of the bag so the first layer of mix is easy to reach. You'll unroll it as you add mix.
- Add 6–8 in (15–20 cm) of moist mix to the bottom, following UNH's guidance.
- Set the seed potatoes on top, sprouts up, about 1 ft (30 cm) apart. In a 10-gallon bag that usually means two.
- Cover them with 6 in (15 cm) of mix.
- Water until it drains from the bottom of the bag.
- Protect early shoots from frost. The RHS suggests covering shoots on cold nights with a cloche, straw or extra compost.
Hilling: adding mix as the plants grow
Hilling in a grow bag means topping up the mix instead of mounding soil. It serves two purposes. Potatoes form on underground stems, so burying more stem gives tubers room to form, and UNH notes that adding soil around the stems encourages more tubers. It also keeps light off the potatoes, which Iowa State and Utah State both note prevents greening.
UNH's guideline is to keep adding mix so about 6 in (15 cm) of foliage stays above the surface. The RHS says to add compost gradually as shoots grow until it sits just below the rim. Unroll the bag sides a little each time.
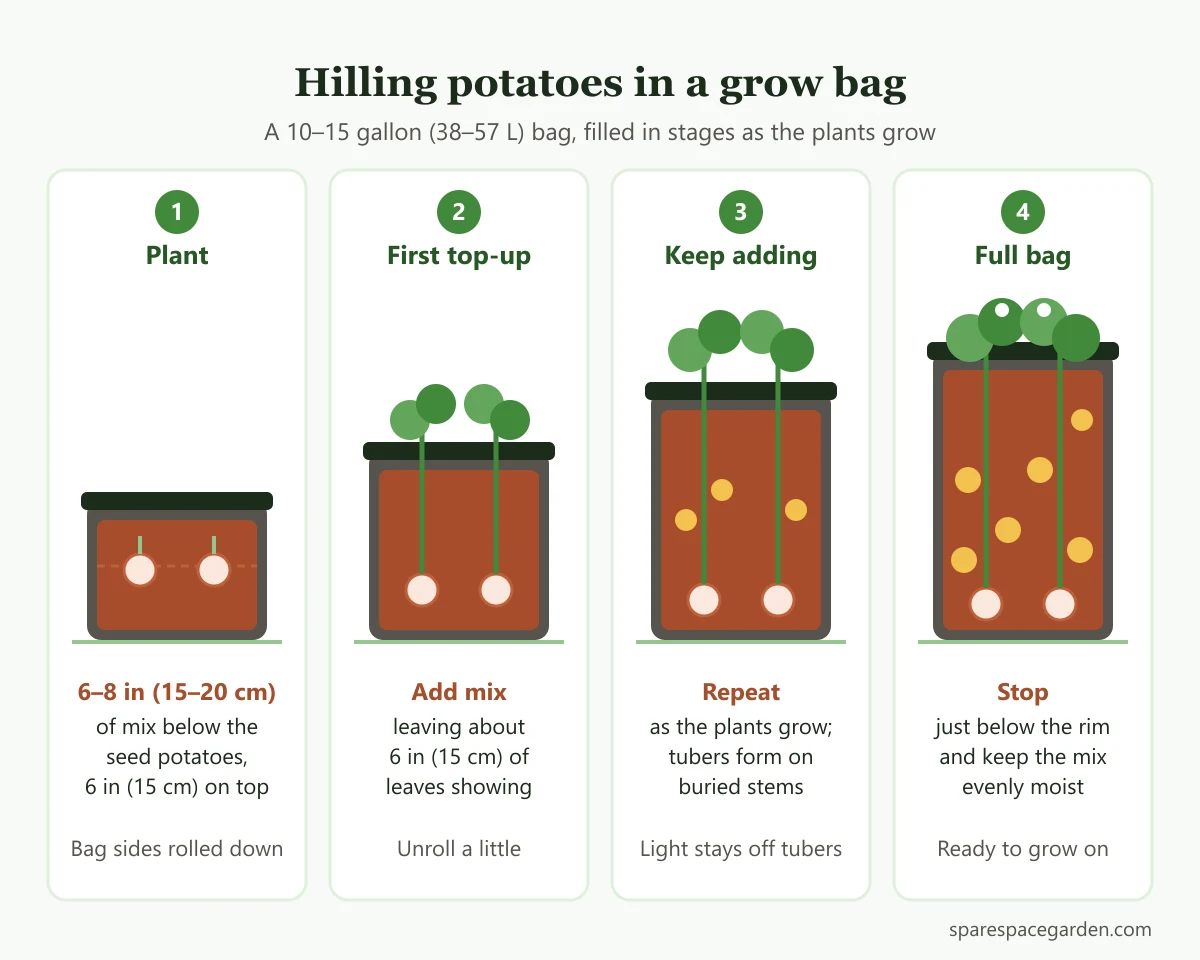 Hilling in a grow bag: add mix in stages, leaving about 6 in (15 cm) of leaves showing.
Watch out: Green potatoes contain solanine, a bitter, toxic compound, according to Maryland Extension. Keep tubers covered while they grow, cut away small green patches, and the RHS advises discarding potatoes that are green.
Watering and feeding potatoes in grow bags
Watering is where growing potatoes in grow bags most often goes wrong. UNH advises keeping the mix moist but not soggy and watering when the top 1–2 in (2.5–5 cm) is dry, until some water drains out. In midsummer, a fabric bag may need water daily. The RHS adds that outdoor containers can need watering even in wet weather, because the leaves shelter the mix from rain.
Even moisture matters most while tubers are forming. Iowa State says alternating wet and dry periods during tuber development can cause hollow heart, growth cracks and knobby tubers. North Dakota State University's page on common scab explains that dry soil during tuber initiation favors scab infection, and that keeping soil moist from tuber initiation until tubers are 1 to 1.5 in (2.5–4 cm) across is reported to reduce it.
Late in the season, ease off. Utah State recommends reducing water as the plants yellow, since wet conditions late in the year promote tuber rot in storage.
For feeding, UNH suggests a balanced soluble fertilizer every couple of weeks once shoots emerge, choosing one with more phosphorus than nitrogen, such as 5-10-10. The RHS notes that many peat-free composts run low on nutrients after about six weeks. Don't overdo it: Utah State warns that heavy fertilizing produces leaves at the expense of tubers. Follow the label for rates, and see our guide to fertilizer for potted plants for product types.
| Problem | Likely cause | Prevention |
|---|---|---|
| Rough, corky patches on the skin | Common scab, favored by dry mix while tubers form | Keep mix evenly moist early on; avoid fresh manure |
| Hollow cavity in the center | Hollow heart from wet-dry swings | Water on a steady schedule |
| Knobby or cracked tubers | Uneven moisture or high soil temperature | Keep moisture even; shade the bag in heat waves |
| Green patches | Light reaching tubers | Keep adding mix; cover exposed tubers |
| Lots of leaves, few potatoes | Too much fertilizer | Feed lightly and follow the label |
Tip: Maryland Extension notes that soil above 80°F (27°C) inhibits tuber development. In a hot summer, group bags together or set them where they get afternoon shade on their sides.
Harvesting new and mature potatoes
One perk of growing potatoes in grow bags is flexible harvesting: take small new potatoes early, full-size potatoes later, or some of each.
New potatoes. Maryland Extension says small new potatoes can be harvested 6 to 8 weeks after planting, usually once the plants flower. The RHS says early varieties are ready when the flowers open or the buds drop, with tubers about the size of a hen's egg. Iowa State suggests digging new potatoes once they are over 1½ in (4 cm) across, while the vines are still green. Reach into the side flap or the top of the bag, take what you need, and leave the rest to grow. New potatoes have thin skins, so Iowa State advises refrigerating them and using them within 10 days.
Mature potatoes. Wait until the foliage yellows and dies back. The RHS suggests cutting off the top growth and waiting 10 days before harvesting, and Maryland Extension suggests leaving tubers in place for 2 weeks after the plants die back so the skins thicken. Iowa State's check is simple: if the skin rubs off easily, wait a few more days.
To harvest, tip the bag onto a tarp, as UNH recommends, and sift through the mix by hand. Brush off loose soil but don't wash potatoes you plan to store. Iowa State recommends curing them for two weeks at 50–60°F (10–16°C) in high humidity, then storing them in the dark at about 40°F (4°C).
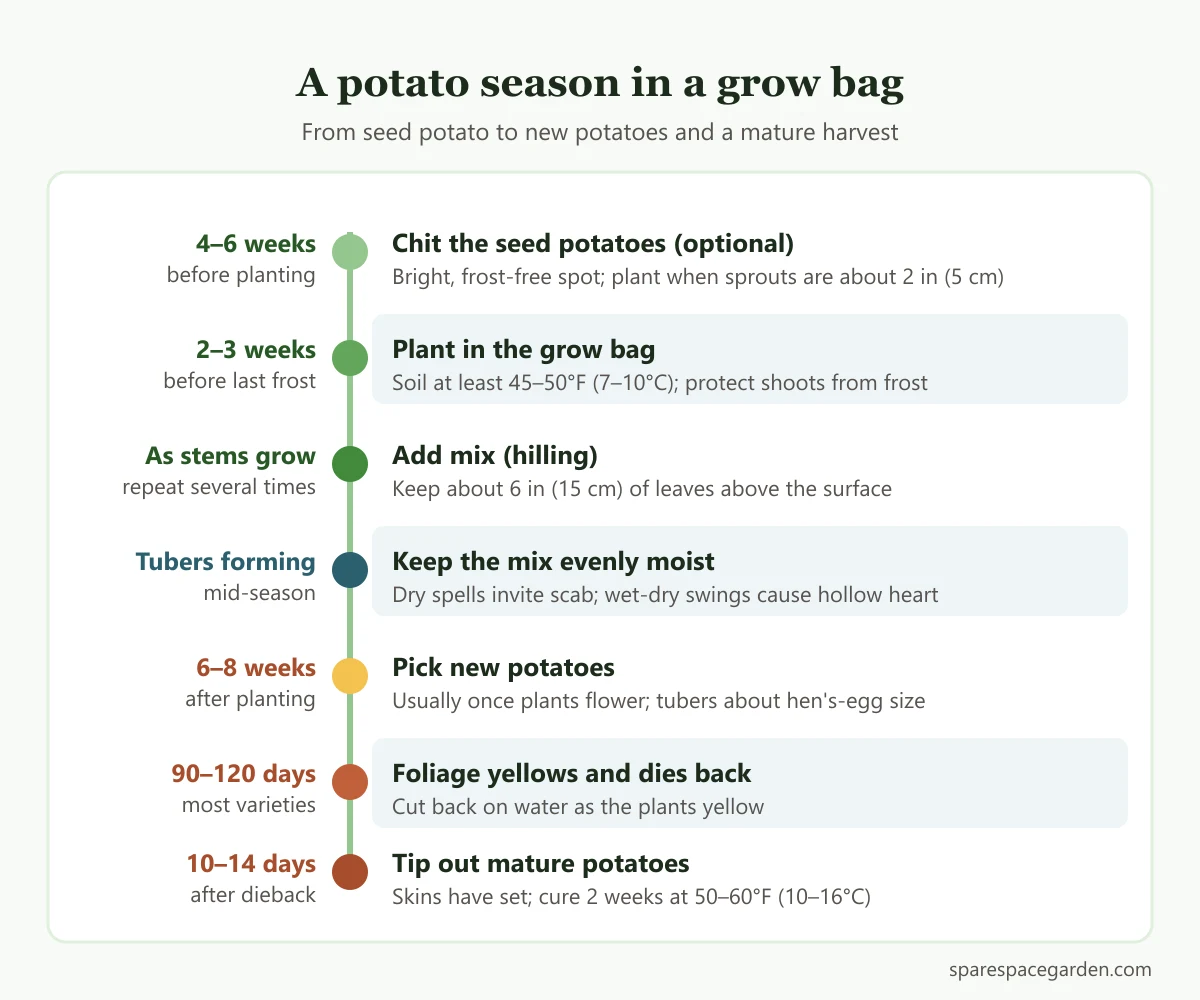 From planting to harvest: when to pick new potatoes and when to wait for mature ones.
What to do with the mix afterward
The used mix doesn't have to go to waste. If the plants were healthy and the potatoes were free of scab, you can refresh it with fresh mix or compost and use it again; our guide on whether you can reuse potting soil explains the ratios. Don't plant potatoes, tomatoes, peppers or eggplant in it next season, since they share diseases. Beans, lettuce or herbs are better choices. If the crop had scab or rot, start the next potato bag with fresh mix.
Frequently asked questions
How many potatoes can you plant in a 10-gallon grow bag?
Two seed potatoes is a good number. UNH Extension plans for about 5 gallons (19 L) of mix per plant and suggests spacing seed potatoes about 1 ft (30 cm) apart. Crowding more into the bag tends to give more, smaller potatoes and a bag that dries out faster.
Can you plant grocery store potatoes in a grow bag?
It's not recommended. Colorado State, UNH and Iowa State Extension note that store potatoes are often treated with a sprout inhibitor, and Maryland Extension warns they can carry diseases without symptoms. Certified seed potatoes cost a little more and are inspected for disease.
How deep should you plant potatoes in a grow bag?
UNH suggests 6–8 in (15–20 cm) of mix in the bottom of the container, then 6 in (15 cm) of mix on top of the seed potatoes. After that, keep adding mix as the plants grow until it's near the top of the bag.
How do you know when potatoes in grow bags are ready?
For new potatoes, look for flowers, usually 6 to 8 weeks after planting, and feel for egg-sized tubers. For mature potatoes, wait until the leaves yellow and die back, then give them 10 to 14 days so the skins firm up before you tip out the bag.
Can you reuse the potting mix from potato grow bags?
Yes, if the crop was healthy. Refresh it with fresh mix or compost and grow a crop from a different family in it next, such as beans or lettuce. If the potatoes had scab or rot, don't reuse that mix for potatoes.