Self-watering containers for vegetables hold a reservoir of water under the potting mix, and the mix pulls that water up to the roots as the plant uses it. You fill the reservoir through a tube, extra water leaves through an overflow hole, and the plant draws a steady supply instead of swinging between soaked and dry.
They suit thirsty fruiting crops such as tomatoes and peppers, and you can buy one or build one from two food-grade buckets in an afternoon. Below: how they work, which crops do well, a two-bucket build, and fertilizer and salt.
Quick answer: A self-watering container has a reservoir at the bottom, a perforated platform or wick that lets the mix draw water up, a fill tube and a side overflow hole. Capillary action moves water roughly 4 inches (10 cm) above the reservoir. Use a 5-gallon (19 L) size for tomatoes, peppers and eggplant, fill with soilless potting mix, and band granular fertilizer on top instead of pouring soluble feed into the reservoir.
How self-watering containers for vegetables work
Every design, bought or homemade, has the same four parts. University of Maryland Extension describes the growing medium sitting on a perforated platform directly above a water reservoir, with an overflow hole on one side instead of drainage holes in the bottom.
- Reservoir: the water stored in the base, its depth set by the overflow hole.
- Platform and wick: a perforated shelf holding the mix above the water, plus a column of mix (often in a small basket or net pot) reaching down into it.
- Fill tube: a pipe from the top to the reservoir, so you can add water without soaking the surface.
- Overflow hole: a hole in the side wall at the top of the reservoir that lets excess water out.
The movement of water is capillary action, the same effect that lets a sponge draw water from a dish. University of Kentucky's publication on wicking containers notes that even when the water sits at the level of the drain hole, capillary action moves it up roughly 4 inches (10 cm). Roots then grow down into that moist zone. The same publication points out that overwatering is controlled by the height of the drain hole, which is why the overflow matters so much.
Mississippi State University Extension calls these containers subirrigated and compares the overflow to the one in a bathroom sink: the container cannot be overwatered. It also makes a useful point: the plant uses about as much water as it would in a regular pot. What changes is how the water reaches it, and how much you can store ahead.
Which vegetables suit self-watering containers?
The best candidates are large, thirsty plants that suffer when the mix dries out between waterings. The New York Botanical Garden calls self-watering containers an excellent choice for thirsty vegetables such as tomatoes, and Maryland Extension names tomatoes, peppers and basil as the most popular bucket-garden crops.
Container size still applies. The figures below come from University of Maryland Extension's guide to growing vegetables in containers, and they refer to the growing space above the reservoir.
| Crop | Minimum container size (UMD) | How well it suits a self-watering container |
|---|---|---|
| Standard tomatoes | 5 gal (19 L) | Very good; heavy water user |
| Cherry tomatoes | 2 gal (7.6 L) | Very good |
| Peppers, eggplant | 5 gal (19 L) | Very good; one plant per bucket |
| Cucumbers | 5 gal (19 L) | Very good with a trellis |
| Summer squash | 10 gal (38 L) | Good in a large tub, not a bucket |
| Bush beans, Swiss chard | 2 gal (7.6 L) | Good |
| Leaf lettuce, beets | 1/2 gal (1.9 L) | Good; a wide, shallow planter works |
| Basil | 2–5 gal (7.6–19 L) | Good |
| Thyme, rosemary | Varies | Poor; prefer mix that dries between waterings |
Kentucky's publication adds that a larger reservoir keeps the upper mix wetter, which can help shallow-rooted, water-loving plants. On the other side, Mediterranean herbs that dislike wet roots are a poor match. See our guide to growing thyme in pots for the drier setup those herbs prefer.
Tip: One big plant per bucket is the safe rule. Kentucky notes that because each container has limited soil and nutrient capacity, crowding several plants into one can mean more frequent feeding and watering.
DIY two-bucket self-watering container
Bought planters can be expensive, and the Illinois Extension blog on homemade self-watering containers suggests building your own as a cheaper option. The build below combines the principles in the Maryland, Kentucky and Illinois designs. Dimensions vary between buckets, so measure yours.
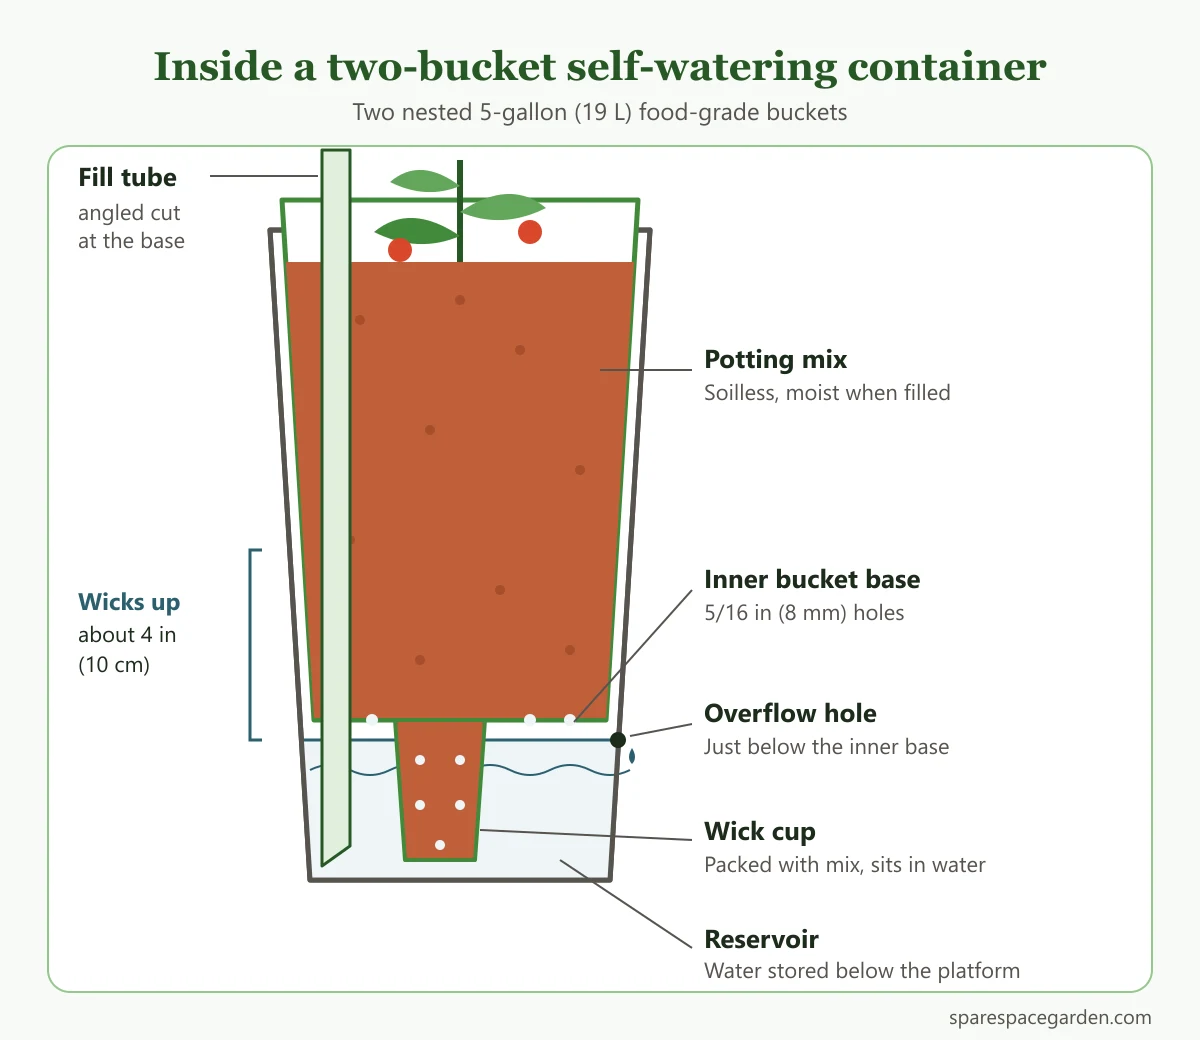 How the parts fit together in a two-bucket build.
What you need
- Two food-grade 5-gallon (19 L) buckets that nest. Maryland Extension notes that restaurants, bakeries and grocery stores often give these away.
- A small plastic cup, yogurt tub or net pot for the wick.
- A length of PVC pipe for the fill tube. Kentucky's larger tub design uses 1.5- or 2-inch (4–5 cm) pipe.
- A drill with a 5/16-inch (8 mm) bit, plus a hole saw or utility knife for the larger holes.
- Soilless potting mix, moistened before you fill.
Step by step
- Measure the reservoir. Nest the buckets and mark the outside of the outer bucket where the inner bucket's base sits. The gap below that line is your reservoir.
- Cut the wick hole. In the center of the inner bucket's base, cut a hole slightly smaller than your cup's rim, so the cup hangs down into the reservoir without falling through.
- Cut the fill-tube hole. Near the edge of the inner bucket's base, cut a hole just wide enough for the pipe.
- Drill the platform holes. Drill a scatter of 5/16-inch (8 mm) holes across the inner base. Maryland's bucket design uses 15 holes of this size so roots can grow down into the water.
- Perforate the wick cup. Punch or drill holes in its sides and bottom so water can enter.
- Cut the fill tube. Kentucky recommends cutting the bottom end at an angle of about 30 degrees so water flows out freely, and leaving the top at least 2 inches (5 cm) above the rim.
- Drill the overflow hole. Drill it through the outer bucket just below your mark. Kentucky says the water level should not rise above the false bottom, and suggests a hole of about 5/16 inch (8 mm) or a little wider so overflow can exit freely.
- Assemble and fill. Set the inner bucket in place, push the tube through to the bottom, and pack the wick cup firmly with moist mix. Then fill the rest of the bucket with moist mix.
- Plant and water. Water the surface once at planting so the mix settles, then fill through the tube until water runs from the overflow hole.
Kentucky also suggests a removable cap for the fill tube, because an open tube can attract mosquitoes.
Potting mix and fertilizer
The mix is what does the wicking, so garden soil is out. Mississippi State recommends a soilless mix of materials such as peat moss, pine bark, coir, vermiculite and perlite, and warns against native soil and amendments meant for in-ground beds. For a homemade blend, see how to make potting soil.
Feeding is where self-watering containers differ most from regular pots. Mississippi State's approach:
- Band dry fertilizer on top. Place granular fertilizer in a narrow strip on the surface rather than mixing it in, so water moving upward releases it slowly. The suggested rate is 0.5 pound (about 1 cup, or 227 g) of 5-5-5, 8-8-8 or 10-10-10 per cubic foot (28 L) of mix, or 1 pound (454 g) of an organic granular product.
- Keep soluble fertilizer out of the reservoir. It can raise soluble salt levels enough to burn roots and slow growth.
- Side-dress heavy feeders. For tomatoes, MSU suggests adding 1 teaspoon (5 mL) of calcium nitrate to the reservoir through the tube.
- Use a cover if you like. A plastic sheet with holes cut for the plants cuts evaporation, nearly ends weeding and protects the fertilizer band.
Maryland Extension notes that slow-release fertilizers last 2 to 3 months, so long-season crops such as tomatoes usually need a second application. Follow the label on any product. Our guide to fertilizer for potted plants covers product types in more detail.
Salt build-up: the hidden drawback
In a regular pot, extra water runs out of the bottom and carries surplus fertilizer salts with it. Maryland Extension says drainage allows excess fertilizer salts to be flushed out. A self-watering container moves water upward instead, so salts can collect in the top layer of the mix.
Watch for a white or pale crust on the mix surface or the container rim, and for scorched leaf edges, which Illinois Extension links to excess soluble salts.
To flush salts, empty the reservoir first, then pour plain water through the mix from the top. Maryland Extension's guidance on mineral and fertilizer salt deposits suggests using at least 3 times the pot's volume in fresh water and letting it drain completely. That advice is written for houseplants, but the principle is the same. In severe cases, it suggests repotting with fresh mix.
Watch out: Don't use softened water. Illinois Extension advises against it for container plants because of its salt content.
Self-watering vs regular pots
Self-watering containers for vegetables aren't the right pick for every crop. This comparison draws on the Kentucky and Mississippi State publications.
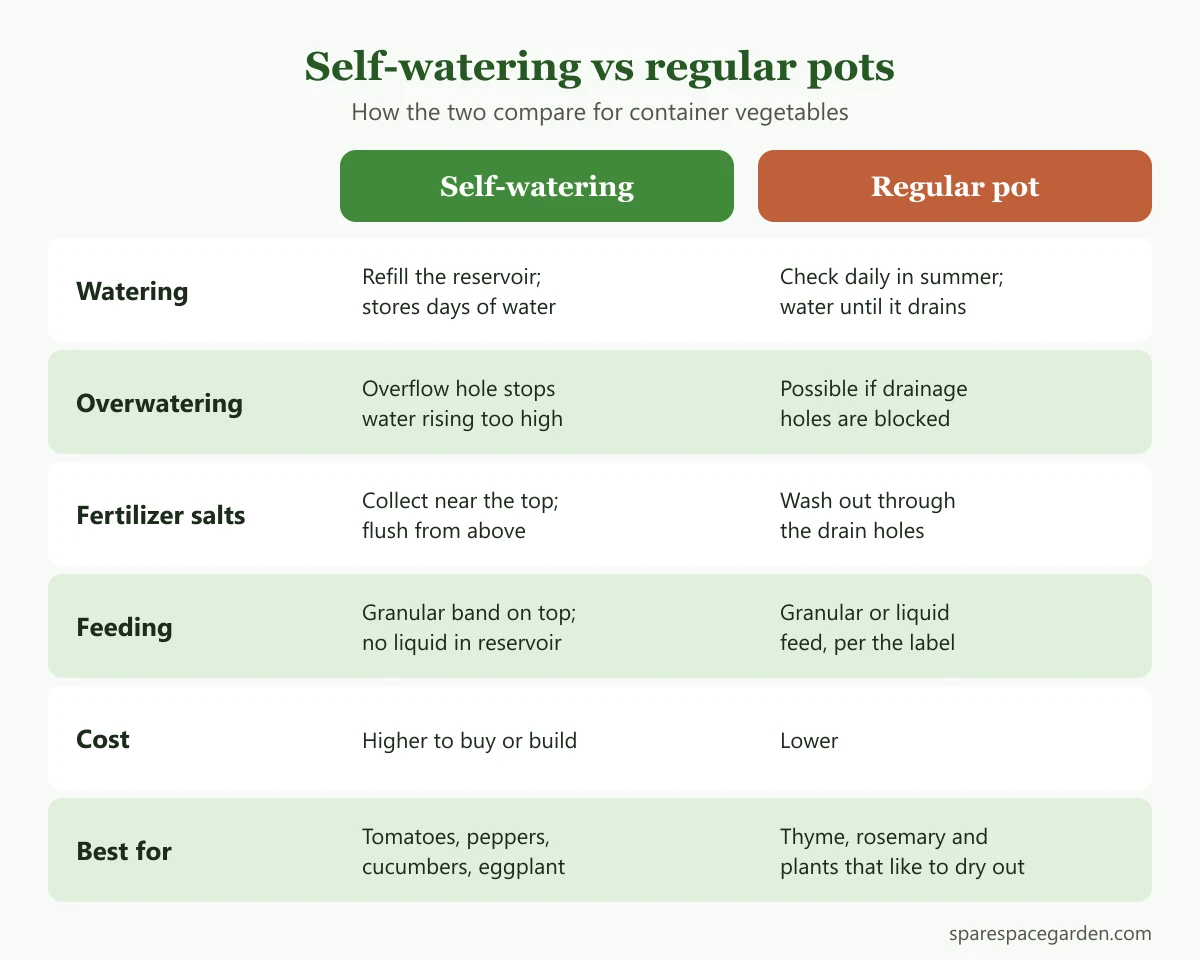 Where each type of container comes out ahead.
Advantages of self-watering containers
- Steadier moisture at the roots, with a buffer for busy days or short trips.
- Watering from below cuts surface evaporation and runoff, according to Kentucky.
- The overflow means you cannot overwater by filling the reservoir.
- Less drainage water on the floor. Maryland Extension lists self-watering containers alongside saucers as a way to avoid stains on concrete and decking, though the overflow hole still drips after rain or overfilling.
- Weeding is almost negligible, Kentucky says, because most water arrives from below.
Drawbacks
- Higher cost to buy or build than a plain pot, as Kentucky notes.
- Salts can collect in the mix, so you need to flush it now and then.
- Soluble fertilizer has to be handled carefully.
- Containers freeze sooner than in-ground beds, and a full reservoir can crack in a hard freeze.
- Plants that like to dry out between waterings do poorly.
If you're planning a whole balcony setup, our balcony vegetable garden guide covers sun, wind and layout.
Refilling, cleaning and end-of-season care
How often you refill depends on plant size and heat. Maryland Extension says a bucket in full sun may need 1–2 quarts (about 1–2 L) of water every day in July and August, unless it rains. Kentucky says a container with light plant growth may go a week to 10 days between fillings, while heavy growth can empty the reservoir in three to five days.
A few habits keep the system working:
- Fill until it overflows. Water running from the overflow hole tells you the reservoir is full. Kentucky suggests leaving some room when heavy rain is forecast, since a flush through the mix carries nutrients away.
- Keep the overflow clear. Check that roots or mix haven't blocked it.
- Top up the mix. Mississippi State says a peat-based mix can last for years with a yearly top-up of new media. If it has slumped badly, see can you reuse potting soil.
- Clean between seasons. Empty the mix, rinse the reservoir and platform, and scrub off any slime or algae before storing.
- Drain before frost. Kentucky says the reservoir must be drained wherever a hard freeze is predicted. Tip the container over to empty it, or move it indoors.
Frequently asked questions
Do self-watering containers work for tomatoes?
Yes, tomatoes are one of the best crops for them. NYBG names tomatoes as an ideal thirsty crop, and Mississippi State suggests a small dose of calcium nitrate in the reservoir to help prevent blossom end rot. Use at least 5 gallons (19 L) of mix for a standard variety. For more on growing them, see tomato plant care in pots.
How often do you fill a self-watering container?
It depends on plant size, weather and reservoir volume. Maryland Extension estimates 1–2 quarts a day for a bucket in full summer sun, while Kentucky reports a week to 10 days for light growth in a larger tub. Check the level daily during hot spells until you learn your container's rhythm.
Can you put liquid fertilizer in the reservoir?
Mississippi State advises against adding water-soluble fertilizer to the reservoir, because it can raise salts enough to burn roots. Band granular fertilizer on the surface instead. The one exception MSU gives is a small dose of calcium nitrate for heavy feeders like tomatoes.
Can self-watering containers cause root rot?
Kentucky notes that the height of the drain hole controls overwatering, because water can't rise above it into the main root zone. Problems usually come from garden soil, a blocked overflow, or plants that prefer to dry out. Keep the overflow open and use a light potting mix.
Do you need to water from the top?
Only at planting, when you flush salts, or if the mix has dried out so far that wicking has stopped. Mississippi State notes that once the reservoir runs dry, capillary action stops. After that, a top watering reconnects the mix to the water below.